Tuesday, June 12, 2018

How to Convert MP4 to WAV or WAV to MP4 Easily

MP4 and WAV are two of the most popular audio file formats that common music players support. Sometimes you need convert MP4 to WAV or WAV to MP4 in order to get better quality, or want to play them on more devices. For example, you get some MP4 videos and want to play the audio in MP4 video on specfic audio players. To do this, you will need reliable software that works efficiently and retains the quality of the audio file being converted. This article will show you the best way to get this job done.

Best MP4 to WAV or WAV to MP4 Converter

 Pavtube Video Converter Ultimate is highly recommended to you. With it, you can not only convert MP4 to WAV but also can transcode YouTube video, YIFY video, Torrent video, MKV, FLV and more video to WAV audio and other audio formats such as MP3, FLAC, AAC, OGG, MKA, WMA, etc. It even can rip Blu-ray and DVD to audio. Of course, you also can convert audio to another audio formats.

To convert WAV to MP4, you can remove the original audio of the video and insert the converted audio file into the video. Moreover, you can merge multiple audio files into a single file and trim a audio clip to make a ringtone. You also can add WAV audio to MP4 video and loop the audio in video. This best MP4 to WAV converter can keep the perfect audio quality when converting audio files or extracting audio from video.

pc try pc buy

mac try mac buy

Quick Guide to Convert MP4 to WAV (WAV to MP4) Easily

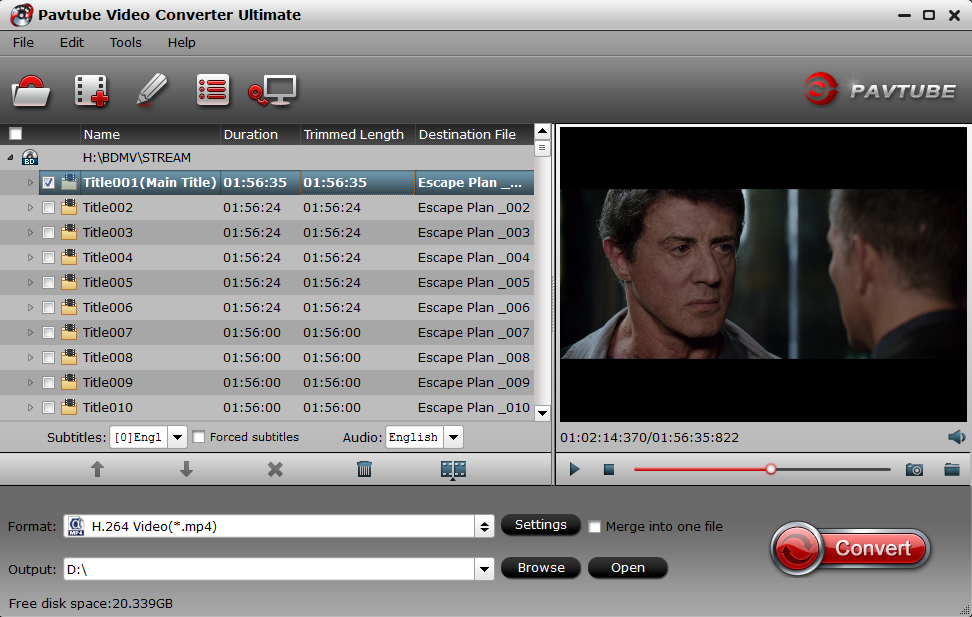
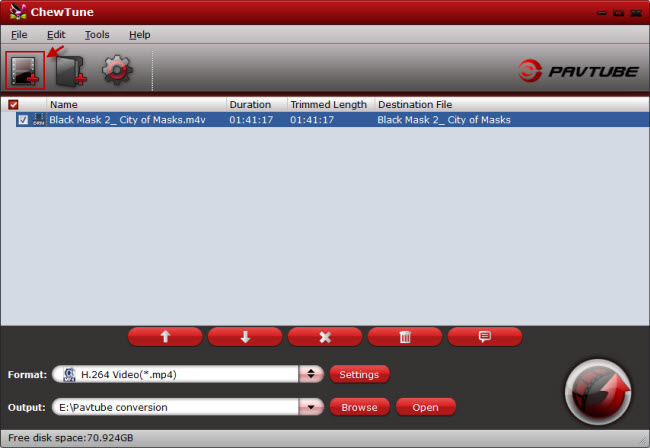
Step 1: Install and open the best MP4 to WAV converter. Directly drag and drop the MP4 files to the software. The batch conversion features allow you to add multiple MP4 files to convert to WAV.

load MP4 video to the best MP4 to MP3 Converter

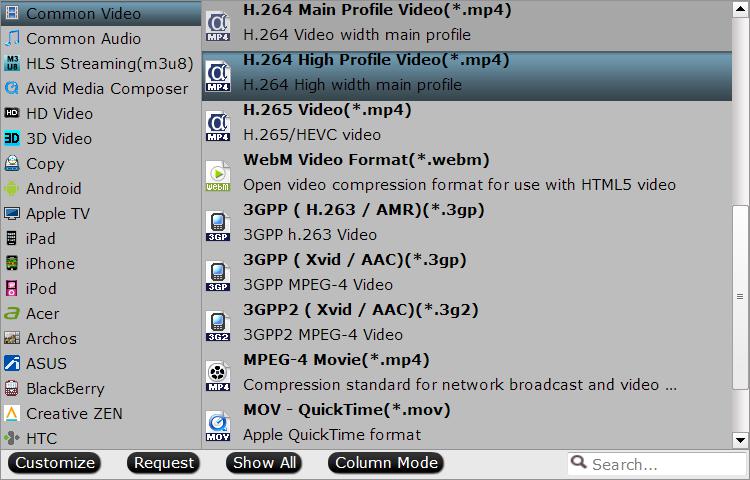
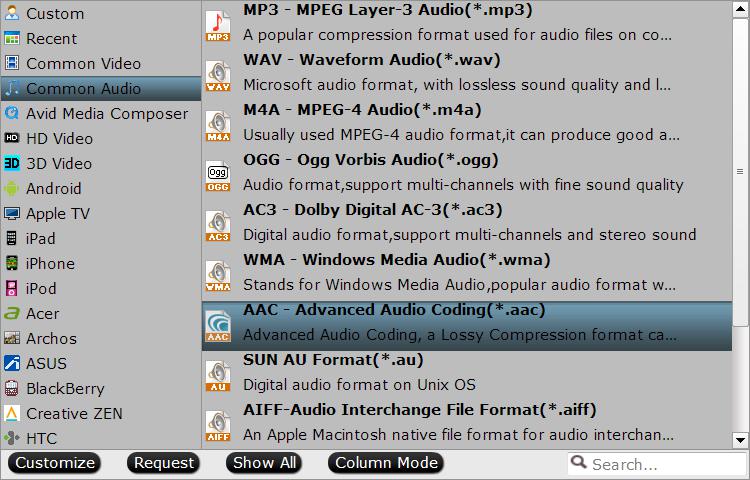
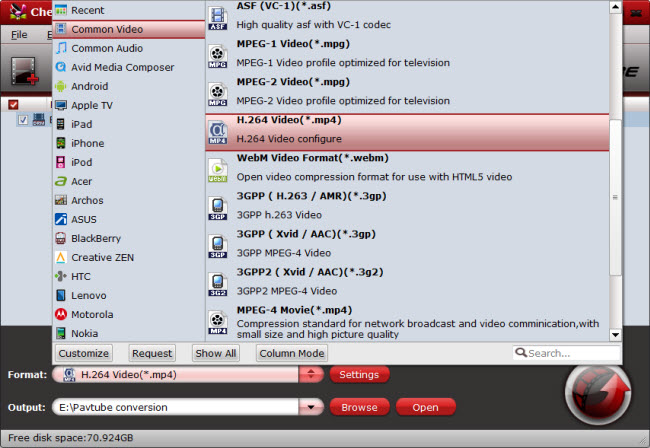
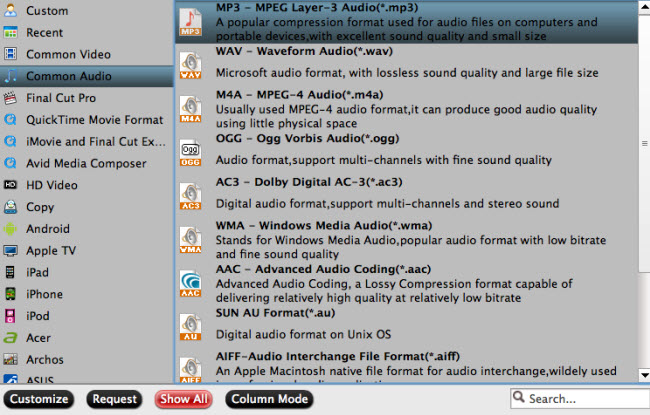
Step 2: Just click the "Format" > "Common Audio", then you will see all the audio formats (AC3, MP3, FLAC, WAV, M4A) we listed and others. Choose WAV format as your need.

wav

Tips:

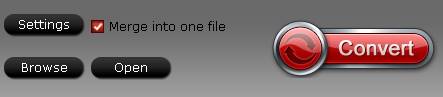
1. If you want to merge multiple audio files, check "Merge into one file" option behind "Settings" button, you can merge the ticked files in list into one single file.

merge

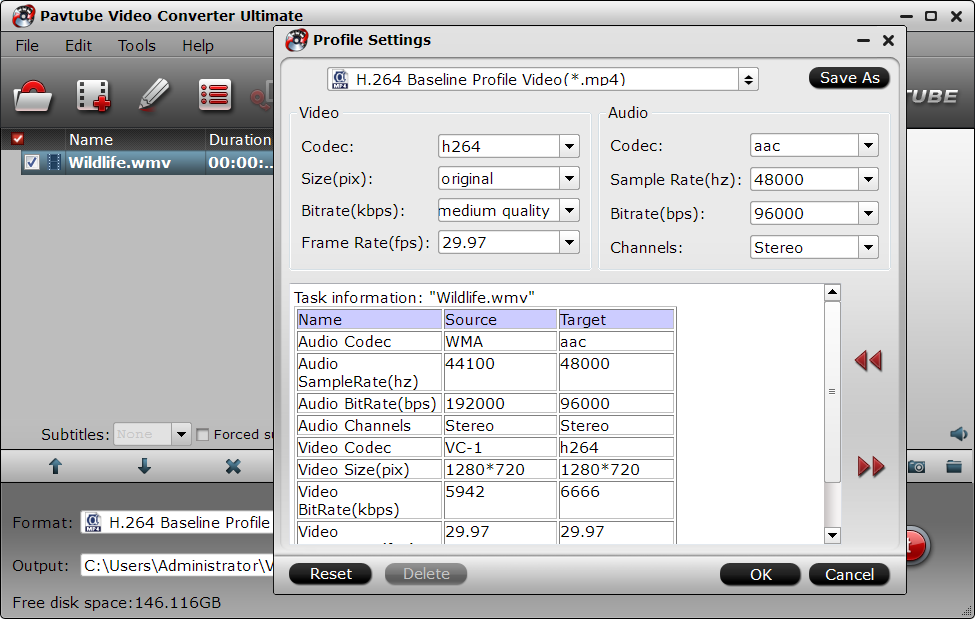
2. All formats here are set with optimized video/audio codecs, bitrates, frame rates, etc. But you can still specify as you like by clicking Settings button. In the Profile Settings window, you can choose or specify exactly the parameters you like.

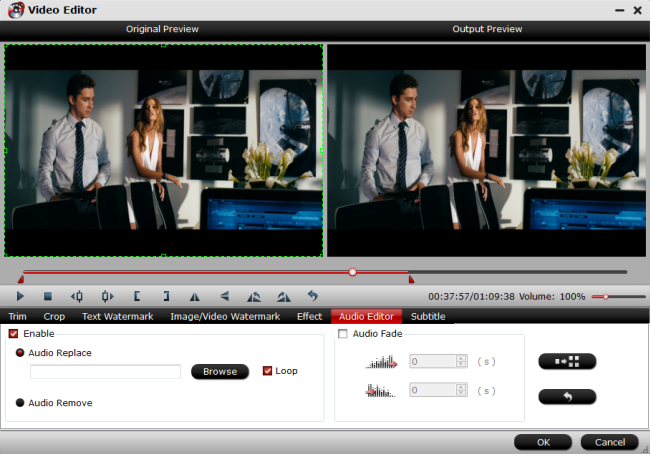
Step 3. For those people who want to replace or remove the audio in the video, you also can finish this task with this software. Load your video into this software, then click the pen-like icon on the UI. You will see 7 tabs in its pop-up "Video Editor" window, click "Audio Editor" tab, then check "Enable" to replace or remove the audio in the video file.

replace the audio

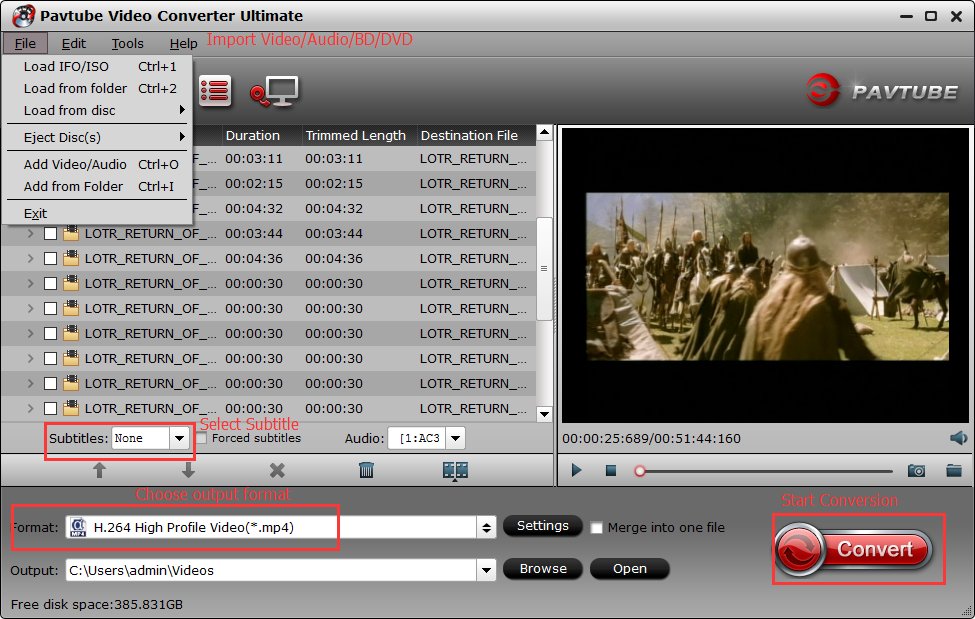
Step 3: Clicking the Convert button on main interface, you can go to MP4 to WAV Conversion window to start conversion. You can find conversion information on the window, such as Time elapsed, Time left, Generated size, and Estimated size. Ticking off Shut down computer after conversion option, you can leave the program running and do other things instead of waiting around for the conversion.

Tuesday, June 5, 2018

How to Convert AC3 Audio in MP4/MKV to AAC Easily

Dolby Digital AC3 is mainly used on DVD, Blu-ray, home cinema, etc. AC3 is covered by patents and decoding AC3 needs to pay a commercial license, which causes some device or audio app developers to ban AC3 from their products, among which the most typical example is Apple products. Apple products, like iPhone, iPad, Apple TV, iTunes, QuickTime, etc can not support AC3 audio. What's worse, the container formats, like MKV, MP4, AVI, MXF, MOV, 3GP, etc,  contain AC3 audio within can not be played by the above said Apple products either. On the contrary, AAC audio can be played by Apple products well. If you need to convert AC3 to AAC, a powerful and professional tool can help you do the job easily.

Part 1. How to Convert AC3 to AAC with A Professional Converter

The recommended professional converter is called Pavtube Video Converter Ultimate (to get Mac version) which is specially designed to convert any popular video and audio files. You can not only change your video/audio files from one container to another, but also easily change the audio track of your video file. Below we have list the things that this video converter can do for you.

Pavtube Video Converter Ultimate(Reivew) - Main Features

  • Convert video or extract audio from over 200+ formats, including MP4, AVI, WMV, FLV, MKV, MOV and more.
  • Convert AC3 audio in MKV, MP4, MOV, AVI, TS, FLV...to ACC with adjusting audio channels: Mono, Stereo, 5.1 channels. Vice versa.
  • Convert MKV, MP4, MOV, AVI, TS, FLV to MP3, AC3, OGG, FLAC, AAC, M4A, WAV, AIFF if you need.
  • Allow you to adjust video parameter in Blu-ray, DVD, digital videos, audio.
  • Edit, enhance & personalize your video/audio files by trimming, cropping, setting effects, rotating, merging, splitting, adding subtitles, and more.

How to Convert AC3 to AAC Audio Codec

The following guide will show you how to convert AC3 to AAC audio codec with Pavtube Video Converter Ultimate, and the steps below are very easy to follow. Check it out.

Step 1. Download or purchase the products you like by hitting bellow button.

pc try pc buy

mac try mac buy

Step 2. Load the MP4/MKV/AVI/MOV file you want to convert in this software by adding from the folder or directly using drag-or-drop function.

load video

Step 3. Define the output format. You can still save the output video format as MKV, MP4, AVI...as you like by selecting the formats from its format list. For example, choose MP4 from "Common Video".

output mp4

Step 4. Adjust the video audio codec by changing the AC3 to AAC in "Profile Settings" window. Apart from that, you are able to adjust video codec, resolution, bit rate, fame rate, sample rate, channels, and more.

Image result for site:multipelife.com ultimate h264 high profile

Step 5. After you have done all settings, then go back to the main UI and press the Convert to start the conversion. When it is over, you can locate the output file in the output folder you set.

Part 2. How to Convert MKV, MP4. AVI, VOB, MOV to Audio Formats

Step 1. Load the MP4/MKV/AVI/MOV file you want to convert in this software by adding from the folder or directly using drag-or-drop function just as Part 1 I show you.

Step 2. The only difference is the step 2. To convert video to audio, you can select the output format as audio formats. Here offers you dozens of options: MP3, AAC, AC3, OGG, FLAC, AAC, M4A, WAV, AIFF...Just select the one you need.

audio formats

Step 3. After you have done all settings, then go back to the main UI and press the Convert to start the conversion. When it is over, you can locate the output file in the output folder you set.

Tuesday, May 29, 2018

How to Get iTunes Movies Music on Nokia 8 for Playback

Using Apple production for a long time, it seems to be a new experience if you try out the lastest Android smartphone. Nokia 8 will be a very good choice. Nokia is pushing the Nokia 8's camera as a key selling point. The 5.3-inch LCD screen packs a quad-HD resolution and looks predictably sharp and colourful.

If you have purchased movies or music from iTunes, you may want to transfer the movies to the new Nokia 8 for playback. When you really set about doing this, you will meet obstacles stopping you to get iTunes movies musics on your Nokia 8, or other Android devices, cause the the movies you purchased from iTunes Store are M4V videos protected with Apple DRM component, which prevents you from watching iTunes movies on non-Apple devices, Nokia 8 is not the exception. Therefore, if you want to transfer downloaded iTunes movies to Nokia 8, just unlock DRM protection from iTunes movies first. 

Pavtube ChewTune, a useful DRM removal program, can help you solve the problem. As for the music, you will find that your Nokia 8 can't recognize all the iTunes music. So, you have to convert iTunes music to Nokia 8 playable audio formats, such as .mp3 and .wma.

All you need to break the limits of DRM protection

  • Legally remove DRM protection from iTunes movies or TV-shows, BD/DVD Digital Copies, Amazon Instant Video, BBC iPlayer, etc.
  • Record DRM files to iOS/Android/Windows, etc. devices supported file type
  • Strip DRM Protection from Audio Files to any audio formats
  • Output any regular format you want with expected quality(MP4, M4V, MOV, AVI...)
  • Support batch conversion and auto-shutdown after conversion
  • Conversion acceleration with NVIDIA CUDA and AMD APP technology

How to sync iTunes M4V videos to Nokia 8?

Step 1: Download and install best DRM removal - Pavtube ChewTune. Both Windows and Mac version are available for users who needs convert iTunes M4V to Panasonic TV MP4 video.

Step 2: Add iTunes M4V video. Click the "Add video" button, search from iTunes library and import video into this app.

Import m4v video

Step 3: Choose optimized format, and customize parameters to get a satisfying video enjoyment on Nokia 8.

Select video format

Step 4: Hit on the "Convert" button. iTunes pops up, plays original iTunes video and iTunes M4V to MP4 conversion begins. Once it is done, open output folder and you would find the saved MP4 video there. Now you are ready to sync and watch iTunes M4V videos on Nokia 8, other Andorid smartphones and tablets fluently.

Tuesday, May 22, 2018

Playing HEVC on iPad Series

Apple have enabled the playback of HEVC videos on MacOS High Sierra and iOS 11, unfortunately not every device is able to support it, and others have limited support. Which ones made the cut? High Efficiency Video Coding, aka HEVC, is set to revolutionize how we create and share media. HEVC promise a 50% storage reduction by encoding video at lower possible bit rate while maintaining a high image quality level. We can expect 4K streaming to get far easier, and sharing videos takes less time. This is good news not just for the users, but for Apple too, who store your iPhone videos on iCloud.

avc vs hevc

HEVC has higher playback requirements than H.264, it's not going to be able to be played on all iPad models, especially on a fairly old iPad. To make your reference, you can see clearly from below chart to know if your iDevice support play HEVC videos or not.

Part 1: Capturing this media

When using iOS 11, the following devices can capture media in HEIF or HEVC format:

  • iPhone 7 or iPhone 7 Plus or later
  • iPad (6th generation)
  • iPad Pro (10.5 inch)
  • iPad Pro 12.9-inch (2nd generation)

Other devices using iOS 11 or macOS High Sierra can view, edit, or duplicate HEIF and HEVC media, with some limitations.

Though capturing in HEIF and HEVC format is recommended, you can capture media using older formats that are more broadly compatible with other operating systems and devices: 

  1. In iOS 11, go to Settings > Camera.
  2. Tap Formats.
  3. Tap Most Compatible. This setting is available only on devices that can capture media in HEIF or HEVC format.
  4. All new photos and videos will now use JPEG or H.264 format. To return to using the space-saving HEIF and HEVC formats, choose High Efficiency.

Part 2: Working with this media

Support for HEIF and HEVC is built into iOS 11 and macOS High Sierra, letting you work with this media in a variety of apps, including Photos, iMovie, and QuickTime Player.

On some older devices, support for HEVC is also affected by the resolution and frame rate (fps) of the video:

  • iPhone 6, iPhone 6 Plus, and iPad Air 2 work with HEVC video that was captured at no greater than 1080p/240 fps.
  • iPhone 5s, iPad Air, and iPad mini (Retina models) work with HEVC video that was captured at no greater than 1080p/60 fps or 720p/240 fps.

If you're using iCloud Photo Library with iOS 10 or macOS Sierra, you might see a warning icon in the upper-right corner of the photo or video, or you might see an alert message. To fully view, edit, or duplicate HEIF and HEVC media on your device, upgrade to iOS 11 or macOS High Sierra.

Part 3: How to Play HEVC MKV, HEVC AVI, HEVC WMA on iPad

Although some old iDevice could not support play or work with HEVC media entirely, there is still method to solve the problem. But a key question left should be solved is that how to play any HEVC videos on lastest iPad model, iPhone X, iPhone 8/8p. HEVC vdieos are wrapped in differnet containers (e.g. MKV, AVI, MP4, WMA, MOV). iTunes suport just MP4/MOV video format. This means you are missing out the biggest chunk of high-quality HEVC movies, that are in MKV, AVI and other formats.

To get this job done, you have to find a super assistant which can convert HEVC MKV, HEVC AVI, HEVC WMA to HEVC MOV, HEVC MP4 for iPad playback. When you searching on the Google, Pavtube iMedia Converter for Mac will be on the top of the list. Once learning more about this software and you will find it won't let you down.

  • Convert HEVC to H.264 for playback on iPad.
  • Convert HEVC MKV, HEVC AVI, HEVC AVCHD, HEVC WMA, HEVC NX1 to H.265 MP4/H.265 MOV for transferring and storing on your iCloud while maintaining the high level image quality.
  • Convert H.264 videos to H.265 for saving half storage space while offers the same video quality.
  • Allows you to adjust video parameters including: video codec, audio codec, bit rate, frame rate, resolution, channels, and more.
  • Allows you to edit, enhance, and personoalize your HEVC videos.

Simple Tutorials to Try Using This Software

Step 1. Load HEVC into this software

Click "File" menu, and select "Load from the folder" to import HEVC files. Or you can directly drag or drop the HEVC to this software. Batch conversion is available here, welcome to try it.

Load HEVC into this software

Step 2. Set output format

Here are two options for you, you can covnert HEVC to H.264, or just take the media from one container to another. For example, click the Format bar, choose the "H.265 Video(*.mp4)" from the "Common Video" category. You also can choose other formats as you like.

Image result for site:multipelife.com imedia converter for mac h.265

Step 3. Customize video parameters

After you have defined the output format, then you are able to adjust video parameters like: video codec, audio codec, resolution, sample rate, bit rate, channels and more.

Customize video parameters

Step 4. Start the HEVC to iPad conversion

When all thing are done, now you can start the conversion by pressing the red Convert button, when it's over, go to the output folder you set to get the generated file. Now you can sync the HEVC to you iPad, iPhone with iTunes, or store on your iCloud for watching on the move.

Tuesday, May 15, 2018

Nokia 8 Supported Fromats, Nokia BD/DVD Converter

Nokia 8 is a perfect smartphone for watching Blu-ray/DVD movies with its height resolution screen. If you have alreadly got this Android smartphone in hand, and if you are movie lovers and collects considerable amount of Blu-ray/DVD discs, you may long for watching the BD/DVD movies during the travel to kill the boring time. So this guide will show you the easiest way to back all your commercial Blu-ray/DVD movies form the plastic dicsc for personal use.

nokia 8

The great screen makes enjoy BD/DVD movies on Nokia 8 fantasitic. But before you start to rip Blu-ray/DVD to your Nokia 8, you need to know of what formats can play well on Nokia 8. Read on to know more.

Nokia 8 Supported Formats

Video – MP4, H.264
Audio – MP3, WAV, eAAC+, FLAC

Obviously, this mobile phone supports limited video formats. So when you search the best Nokia 8 BD/DVD converter to convert BD/DVD to H.264 MP4 for playback on Nokia 8 on Google, it will show you top several applications for you. And Pavtube ByteCopy | for Mac is on the top of the list.

What Can Pavtube ByteCopy Do for You?

  • Powerful ability to bypass copy and region protection on a commercial 2D/3D Blu-ray disc, DVD disc. You also can import Blu-ray/DVD folder, DVD IFO file, Blu-ray ISO Image file.
  • Copy and convert Blu-ray/DVD to various video/audio formats for your Nokia 8, like H.264 MP4.
  • This software allows you to lossless copy Blu-ray/DVD to Multi-track MKV format to help preserve Blu-ray 5.1 or 7.1 surround sound or other popular multi-track formats such as MP4, MKV, MOV for viewing on HD media players with multiple audio tracks and channels on Nokia 8, tablets, iPhone, and more.
  • Massive copy options for you. You can 1:1 full disc copy Blu-ray/DVD movies with all the subtitle languages, audio tracks and chapter information well preserved, or only copy the main title without unwanted extras.
  • Massive optimized device presets like Nokia, Asus, Samsung Galaxy Tab series, iPhone X, iPhone 8, Samsung Galaxy Note series, Xbox One series, Apple TV series, Wii U, Adobe Affter Effects, Adobe Premiere, and more.
  • This feature-rich software also work as a proferssional video editor. With it, you can trim to cut BD/DVD movies length, add external subtitles to it, replace or mute audio, and more.

Quick Guide to Play Blu-ray/DVD on Nokia 8

Step 1. Load BD/DVD with this program

Install the best Blu-ray/DVD ripper on PC. then open it, click the "Load from Disc" icon to import the Blu-ray/DVD Disc. You also can load the BD/DVD folder by choosing the "Load from folder" from the dropdown list of "File", of course, you also can choose to load the ISO image files, IFO files too.

load Blu-ray

Step 2. Choose output format according to your own needs

Click "Format" bar, you will see hundreds of video formats here. You can navigate to "HD Video" and select "H.264 HD Video(*.mp4)". Or you can choose from "Nokia" category.

set output formats

Step 2. Adjust video parameters

If you have defined the output format, then click the "Settings", here you can adjust vdieo parameters like: video/audio codecs, bitrates, frame rates, channels, etc.

edit bd dvd

Step 3. Start the conversion

After all settings are done. Return back to main interface, and click convert, it will begin to copy and convert your Blu-ray/DVD movies. Wait for a while, when it is over, click Open, and it will pop up a folder with generated files. Now you can transfer the covnerted movies to your Nokia 8 for watching on the go.

Tuesday, May 8, 2018

Play 4K Blu-ray on Sony Xperia XZ Premium

The Sony Xperia XZ Premium has everything you want when paying top dollar for a phone, with its 4K display and slow motion camera two standout party pieces. It will please Sony fans around the world. With this smartphone, ripping all your 4K Blu-ray movies to this smartphone and enjoy them during the trip to kill the boring time will be a good experience. So to complete the task, you have to get a super Blu-ray ripping software that can really handle 4K Blu-ray movies.

Sony Xperia XZ Premium

When you try to find the best 4K Blu-ray ripping software on Google, it will show you many applications. Pavtube ByteCopy (to get Mac version) will be in your sight, which stands out from its competitors. To ensure you to gain insight into this software, we have listed its main features below for you.

Main Features of Pavtube ByteCopy

  • Powerful ability to bypass copy and region protection on a commercial 2D/3D Blu-ray disc, 4K Blu-ray discs. You also can import 4K Blu-ray folder, DVDs, DVD folder, DVD IFO file, DVD/Blu-ray ISO Image file to this program.
  • Recently, Pavtube Blu-ray Rippers have upgraded to v4.9.2, added support for Blu-ray AACS MKB v63.
  • Copy and convert 4K Blu-ray to various video/audio formats for your Sony Xperia XZ Premium, like H.264 MP4, AVI, WMV, MKV, and more.
  • This software allows you to lossless copy 4K Blu-ray to Multi-track MKV format to help preserve Blu-ray 5.1 or 7.1 surround sound or other popular multi-track formats such as MP4, MKV, MOV for viewing on HD media players with multiple audio tracks and channels.
  • Massive copy options for you. You can 1:1 full disc copy 4K Blu-ray movies with all the subtitle languages, audio tracks and chapter information well preserved, or only copy the main title without unwanted extras.
  • Massive optimized device presets like Sony, Asus, Samsung Galaxy Tab series, iPhone X, iPhone 8, Samsung Galaxy Note series, Xbox One series, Apple TV series, Wii U, Adobe Affter Effects, Adobe Premiere, and more.
  • This feature-rich software also work as a proferssional video editor. With it, you can trim 4K Blu-ray movies length, add external subtitles to it, replace or mute audio, and more.

Steps to Play 4K Blu-ray on Sony Xperia XZ Premium

Step 1. Load 4K Blu-ray with this program

Install the best 4K Blu-ray ripper on PC. then open it, click the "Load from Disc" icon to import the 4K Blu-ray Disc. You also can load the BDMV folder, DVD folder by choosing the "Load from folder" from the dropdown list of "File", of course, you also can choose to load the ISO images too.

load Blu-ray

Step 2. Choose output format for Sony Xperia XZ Premium

Click "Format" bar, you will see hundreds of video formats here. You can navigate to "HD Video" and select "H.264 HD Video(*.mp4)". Or you can choose formats from "Sony" category.

set output formats

Step 2. Adjust video parameters

If you have defined the output format, then click the "Settings", here you can adjust vdieo parameters like: video/audio codecs, bitrates, frame rates, channels, etc.

Image result for pavtube video converter settings h.264 hd mp4

Step 3. Add external subtitle to 4K Blu-ray movie

Click pencil-like icon on the UI, enter the "Video Editor" window, here are 7 tabs for you. In Subtitle tab, you can add *.srt or *.ass/*.ssa subtitle-files to the 4K Blu-ray movie as hard subtitles.

Add external subtitle to 4K Blu-ray movie

Step 4. Start the conversion

After all settings are done. Return back to main interface, and click convert, it will begin to copy your 4K Blu-ray movies. Wait for a while, when it is over, click Open, and it will pop up a folder with generated files. Now you can transfer the covnerted movies to your Sony Xperia XZ Premium for watching on the 4K display.

Wednesday, May 2, 2018

How to Transfer and Play iTunes DRM Videos Movies on Surface Pro?

Q: Recently, I intent to buy a Surface Pro tablet instead of my crashed Mac and then to watch my iTunes movies and TV episodes on it, as it is equipped with a high screen resolution. But, I heard from my friends that iTunes videos are not available for non-Apple devices due to the FairPlay DRM technology. Therefore, before I decide to purchase this smart Surface Pro tablet, I would like to know is there any software can help me to transfer iTunes videos to Surface?

surface pro

Better than ever, the new Surface Pro gives you a best-in-class laptop, plus the versatility of a studio and tablet. The stunning PixelSense Display supports Surface Pen1 and touch, while up to 13.5 hours of battery life2 gives you plenty of juice to work all day and play all night. That's why the guy choose this tablet. So is there any application could complete the task? Of course.

When you're searching on the Internet, you will find the Pavtube ChewTune is the best one (Top DRM Removal Converter download) for free trial, the program not only helps to legally remove DRM protection from iTunes store purchased movies and TV shows, but also convert iTunes video to Surface Pro 4/Pro 3/Pro 2/Pro best playable formats H.264 MP4.

Key features to break the limits of DRM protection

  • Legally remove DRM protection from iTunes movies or TV-shows, BD/DVD Digital Copies, Amazon Instant Video, BBC iPlayer, etc.
  • Record DRM files to iOS/Android/Windows, etc. devices supported file type
  • Strip DRM Protection from Audio Files to any audio formats
  • Output any regular format you want with expected quality(MP4, M4V, MOV, AVI, MKV..)
  • Support batch conversion and auto-shutdown after conversion
  • Conversion acceleration with NVIDIA CUDA and AMD APP technology

How to Play DRM iTunes Movies and Videos on Surface Pro

Step 1. Import DRM-protected iTunes videos movies.

Run the program on your computer and click "File" to browse the DRM videos you have purchased from iTunes store, and select those you want to convert for watching on Surface Pro.

Import DRM-protected iTunes videos movies

Step 2. Choose Surface Pro supported format

Microsoft Surface tablets can play videos in MP4 format well. Go the output format list by clicking the format bar, and follow "Windows" > "Microsoft Surface Windows RT/Pro H.264 Video (*.mp4)."

Choose output file format

Step 3. Start converting iTunes DRM videos to Surface Pro.

Click the start conversion icon which is in round shape located in bottom right screen to start removing DRM protection from iTunes movies or TV shows and convert them to Surface Pro playable MP4 format.