Wednesday, March 28, 2018

Tutorials to Transcode H.265 to H.264 for Playback

Difference between H.265 & H.264

h265 h264

High Efficiency Video Coding (HEVC), aka H.265 is a video compression standard designed to substantially improve coding efficiency when compared to its precedent, the Advanced Video Coding (AVC), or H.264. It is the natural successor to H.264, and is now started to become adopted as a mainstream product with vendors manufacturing h 265 hevc encoder products as oppose to h 264 video streaming products.

x264 vs x265

HEVC the video compression standard ensures delivery of video quality identical, and in some cases with much more improved picture quality, as H.264 AVC, but an HEVC H.265 encoder offers double the data compression ratio, that is an improved efficiency of 50% over H.264.

With an increasing growth of video streaming on the Internet over popular websites such as Netflix and YouTube, and with 4K cameras gaining new ground in the market, HEVC will be widely used in the near future. But not now.

Majority of PCs, mobile devices, TVs, players and platforms work well with H264, while equivalent hardware or software for decoding HEVC (H265) is dramatically less common. So, to ensure a smooth H265 video playback on your smartphones or tablets or other devices, you'd better convert H265 to H264.

Encode H.265/HEVC to H.264

After figuring out the truth that most devices, media players could't support HEVC playback so far and H.264 still dominates the market. What we can do is to convert HEVC to H.264 for play on most devices. There are tons of H.265/HEVC Decoder and Encoder on the internet, but it is not easy to get a perfect one. Here I strongly recommend you Pavtube Video Converter | for Mac which is easy to use and grants you to transcode H.265 to H.264 on Windows or Mac with just three steps.

Furthermore, you also can make your H.265 more attractive by editing the video. If you're confused with the length of the video, you can trim to cut video length; you also can adjust video brightness, saturation, contrast to add dominant tone in the video. For those people who want to insert the external subtitle to the video and make it easier to understand, you are in the right place, in the "Video Editor" window, you will be satisfied.

Quick Guide to Convert H.265/HEVC to H.264 with Pavtube

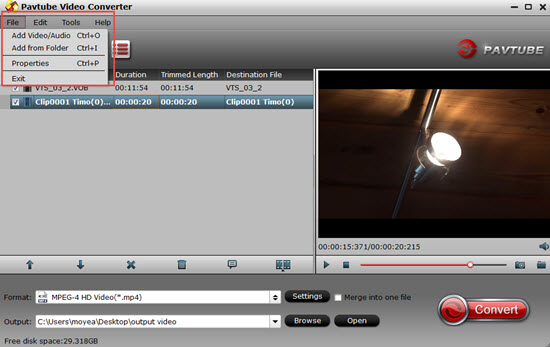
Step 1: Load H.265 video files

Drag your files into this H.265 HEVC Video Converter, with "File"> ‘Add video’ you can load them with individual clips, or with ‘Add from folder’ you can import them with a complete folder. Batch conversion is also available.

load h265

Step 2: Convert your H.265 videos into H.264

Go to the format bar to choose "HD Video">"H.264 HD Video"(*.mp4)".

select h264

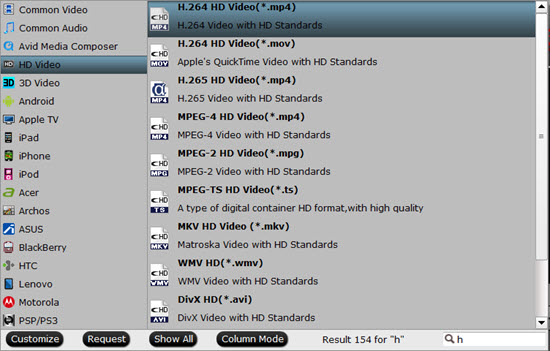
If you want to transcode H.264 to H.265, you can choose HD H.265 MP4 video or any other video formats.

Tips:

1. If you want to convert your H.265/HEVC videos into common formats like MP4, AVI, MKV, FLV, M4V, etc, click here for detailed workflow.

2. Since this codec will compress into smaller file size while maintain the HD quality, the converting progress will take much longer than H.264 or other common codecs.

3. "H.264 HD Video(*.mp4)" option will output your files as H.264 high profile, which will reduce the quality H.265/HEVC degradation to the least.

4. Or if you want to keep the most quality of your videos, keep the original parameters in the "Settings" UI is also available.

Edit H.265 HEVC video files – Optional

There are still some popular functional items we can take around on the main interface, for example, in the ‘Edit’ button, we have offered you the ‘Trim’ to decide the video length, ‘Crop’ to remove the unwanted edges, ‘Subtitles’ to add some extra explanations? More you can have a try here.

video converter edit video

Step 3. Start H.265 to H.264 Conversion

Click Browse to specify a destination folder to save the converted video file. Hit "Convert" button to start to convert HEVC/H.265 to H.264/AVC on Windows or Mac with this high-class H.265 converter at lightning speed.

Even though H.265 is superior to H.264 based on demand, quality, size or compression rate, H.264 is much suitable for normal usage. By using Pavtube Video Converter to convert H.265 to H.264, you will have lots of options to watch videos and its time saving too.

Wednesday, March 21, 2018

Tips and Tricks to Edit DVD with Windows Movie Maker

Windows Movie Maker is a easy-to-use & powerful video creating/editing software application, designed for latest Windows7, Windows 8, Windows 10. It contains features such as effects, transitions, titles/credits, audio track, timeline narration, and Auto Movie. Windows Movie Maker is also a basic audio track editing program. It can apply basic effects to audio tracks such as fade in or fade out. The audio tracks can then be exported in the form of a sound file instead of a video file. Want to extract DVD movie from the plastic and input the video into Windows Movie Maker for further editing, but have no idea? Keep reading to get the tutorials.

Windows Movie Maker

Import DVD movies into Windows Movie Maker

To load DVD to Windows Movie Maker for postproduction, what you need to get is a profesisonal DVD ripper help you convert DVD movies to Windows Movie Maker editable file formats like WMV, QuickTime MOV, DV AVI, MPEG-4, MPEG-2, MPEG-1, etc. What program can help you? You can search a lot of free DVD ripper software on the internet such as Handbrake, MakeMKV, Format Factory, VidCoder, MediaCoder, WinxDVD Ripper etc, as you know, there is no free lunch in the world, free DVD ripper always come with many limitations. Some of the free DVD Ripper software like MakeMKV can only helps to backup DVD into a large MKV file, you still need to convert the MKV file into Windows Movie Maker supported file formats with a video encoding application.

So here is a comprehensive DVD/BD/video converter which is called Pavtube Video Converter Ultimate | Mac (review) can bypass all DVD/BD copy protection, recently, it has upgraded to v4.9.2, added support for Blu-ray AACS MKB v63. It not only help you convert DVD/BD to WMV, MOV, AVI, MP4, MPGE-2, MKV, M4Vetc video formats, but also offers massive optimized device presets with the most standard video/audio codec.

Moreover, before you edit the movie with Windows Movie Maker, this DVD copier enables you to  trim or cut video to remove unwanted DVD movie parts or segments, merge separate DVD movie into one, split large DVD/BD files into small parts by file size, length or count, crop the black bars around the video frame, add video/image/transparent text watermark to video, apply special rendering effects to video, remove/replace audio in DVD video, add external srt/ass/ssa subtitles to DVD, etc.

Quick Guide to Rip Commercial DVD for Windows Movie Maker Editing

Step 1: Load DVD disc into the program.

Insert your DVD disc into the optical drive on your computer, launch the program, on the main interface, click "File" > "Load from disc" to load DVD disc with copy protection into the program.

Note: You also can load Blu-ray to this software, besides, loading common video like MKV, MOV, AVI, VOB, 4K MKV, 4K MP4, 4K MOV, 3D MKV/MP4/MOV, even all video formats is available here. Is it a surprise?

load dvd

Step 2: Select output format file format.

Click the pull down menu of "Format", then you will be able to select a Windows Movie Maker supported format from the output format profile, for outputting a high quality WMV format to edit with Windows Movie Maker, just output "WMV3(WMV9)(*.wmv)" under "Common Video" main category. For fast conversion speed, "WMV2(WMV8)(*.wmv)" would be the best output options.

wmm supported formats

Tip: If you are familiar with video format, container and codec, you can directly choose video format, then adjust the video and audio bitrate, frame rate, resolution, channel and more parameters to make the outputed video more fit in your video player and multimedia devices. Just hit Settings bar to achieve above goal.

Step 3: Edit DVD video.

Check a DVD title on the main interface to active the "Video Editor" function, then click the pencil like icon on the top tool bar to open the "Video Editor" window, you can trim video length, crop video black bars, add watermark, apply sepcial rendering effect, remove/replace audio in video, etc.

edit wmv

Step 4: Start the final DVD Ripping process.

After all the settings is completed, hit right-bottom "Convert" button to start to rip commercial  DVD to Windows Movie Maker editable file formats.

When the conversion is completed, hit the "Open Output Folder" on the main interface to pop out the folder with the converted files. Then feel free to load video into Windows Movie Maker with no problem.

Wednesday, March 14, 2018

Rip DVD to Amazon Kindle Fire HD for Entertainment

Despite Apple's iPad has dominated the tablet market since its first release, there still are many other excellent tablet computers springing up daily. One is called Kindle Fire HD, a brand-new Android tablet made by Amazon has become the strong rival to iPad, Galaxy Tab, etc since its first launch. Its 7-inch multi-point touch screen, 1280-by-800-pixel display resolution, 11 hours long battery life and at least 16 GB storage make it quite appealing for watching movies and TV shows.

For DVD lovers, transfering all your DVD movies to the Kindle Fire HD from the plastic will be a wise choice. Before you get to start, you have to know two things. One is how to copy the DVD movies from the disc, the other is how to make the DVD movie format compatible with the Kindle Fire HD. Calm down, all problems can be settled in this post.

Firstly, as we all know, Kindle Fire HD only supports H.264, MPEG-4 and VP8 video formats, so what you need to get is a third-part software which can copy the movie from DVD disc and convert the file to Kindle Fire HD supported video formats. Pavtube Video Converter Ultimate | For Mac could complete the above conditions, respectively.

Main Functions of Pavtube Video Converter Ultimate

  • Rip DVD to more than 200 video and audio formats, like: MP4, MKV, MOV, AVI, MP3, AAC, etc, so you can transfer the generated files to Kindle Fire HD, Acer Switch 3/5, iPhone 8, iPad, Samsung Galaxy Note 8, Galaxy S9, Gear VR, XBox One, PS4 Pro, Vizio TV, Apple TV 5, or for other non-linear editing software, including After Effects, iMovie, and more.
  • Convert DVD to any format with H.264/H.265 codec with 30X faster conversion speed.
  • Supports 1:1 DVD copy, you don't need to worry about the video backup quality.
  • Professional video editing functions like trimming or cropping video, adding external SRT/ASS/SSA subtitles, adding watermark, changing video effects. More features you can read this guide.

How to Rip and Copy DVD to Kindle Fire HD

Step 1. Add DVD movies

Insert the DVD disc into your computer's DVD drive and launch the DVD to Kindle Fire HD converter. Then click "Load DVD" icon or "File">"Load from disc" to select and import the DVD files you want to rip to this program. If necessary, loaded files can be previewed in the right viewing window and you can take snapshots of your favorite movie scenes. Besides DVD, you can also load Blu-ray discs, Blu-ray Folder, Blu-ray ISO Image File for watching on Kindle Fire HD.

add dvd

Step 2: Output Kindle Fire HD playable file formats

Hit format up-down bar and navigate your cursor to "HD Video" and select "H.264 HD Video(*.mp4)". You also can choose other formats according to your needs from other main category.

output h264

Step 3: Add subtitles to DVD movies

This program also works as video editor, if you want to learn some foreign languages by watching DVD movies, however, the DVD movies have no corresponding subtitles, now you can download the subtitles you want and insert it to your DVD movies. How to do? Here is a video for you to make reference.

Step 4: Start ripping DVD movies

After all necessary settings, go back to the main interface and click "Convert" to begin ripping your DVD movies for playback on Kindle Fire HD. When the ripping completes, you can click "Open Output Folder" button to located the ripped video files directly.

After conversion, you can transfer all the output video to your Kindle Fire HD with USB port, and enjoy the result on the move.

Wednesday, March 7, 2018

Pavtube Video Converter Ultimate Has Upgraded to v4.9.2 Support MKB63

Recently, Pavtube Video Converter Ultimate has upgraded to v4.9.2, added support for Blu-ray AACS MKB v63. By now, you are thinking what does that have to do with you? Well for our users who have purchased the product can upgrade the software for free, meanwhile, for others, here is a chance which can help you enjoy your Blu-ray and HD DVD medias in a more flexible way. What are you waiting for? Here we go!

Have you met the problem that Ice Age 1-4 worked with MakeMKV while Ice Age 5 couldn't be read? Or couldn't your BD Drive detect your recently bought new Blu-ray disc and it just says : No Disc found? When meeting this kind of issues, the major reason will be the block of Blu-ray copy protection such as the latest Blu-ray AACS MKB version 63

What is Blu-ray AACS MKB version 63?

The MKB is one of the keys included inside the copying protection system AACS, which is used to protect Blu-ray and HD DVD formats. The MKB has the function of validating the reproduction devices on which the disc is being played and obtaining, from the devices codes, the key that will allow the decryption of the disc content. The system was developed by companies from the film industry and the electronics industry including IBM, Intel, Microsoft, Matsushita (Panasonic), Sony, Toshiba, The Walt Disney Company and Warner Bros.

Therefore, your Blu-ray Ripper that doesn't upgrade in time and old Blu-ray Drive can not read the latest Blu-ray discs you bought, which are released by the companies due to higher Blu-ray copy protection. But with Pavtube Pavtube Video Converter Ultimate, you can easily remove the MKB version 63 protection of the Blu-ray movie and convert them to MP4, MOV, AVI, MKV even more than 200+ video formats for transferring to iPhone X, iPhone 8/8P, Samsung Galaxy series, TVs, game console for playback.

What’s New?

1. Added support for AACS MKB v63

2. Small miscellaneous improvements

3. Fix some bugs.

Key Features of Pavtube Video Converter Ultimate

ultimate

– Rip BD/DVD to HTML5 WebM/MP4 for uploading to YouTube, FB, Vimeo, Instagram.

– Convert Blu-ray/DVD to AVI, MP4, MOV, QuickTime, ProRes for editing in NLE software.

– Rip Blu-ray/DVD to M3U8 for HTTP live streaming and other video formats for playback.

– Choose your desired subtitle streaming when your disc have multiple tracks.

– Shrink and compress Blu-ray and DVD to a smaller size video file to save hard disc space.

– More features in the review.

Quick Guide for You to Know This Software in Depth

Step 1. This software allow you to input BD/DVD common video to it. When you want to convert some videos to other video formats, batch conversion is available here. Moreover, you can click "Load from the disc" to load the BD/DVD from the player. When the Blu-ray is loaded, all the chapter will be listed on the left. The main title is checked automatically. Generally, a Blu-ray movie will have several subtitle and audio tracks. If you don't need all the tracks, you can choose your desired subtitle streaming in "Subtitle".

load file

Step 2. No matter what you have loaded, the second part is to define output format. Click up-down format bar, you will see a dozens of video formats, scroll down one by one, you can see the submenu of the each main menu, including editing software, TVs, Samsung, game console, Apple and more.

output formats

Step 3. Do some video change. If you are familiar with the video parameters. Good news for you. After you define the output format, then you can click Settings on the UI in the pop-up windows, you are able to change video/audio codec, bit rate, resolution, channels, and more.

Little tip: Video size is based more on bit rate than resolution, lower the bit rate to get smaller video size.

Furthermore, you also can trim to cut video length, add external subtitles to you video, add text/image watermark, change video effect, by press the pen icon on the top of the UI.

edit video

Step 4. After you have done all settings, then press the red Convert button to start the conversion. Wait for a while, go to click Open and it will pop up a folder with the generated files.