Tuesday, February 27, 2018

How To Backup Blu-ray To Google Drive For Samsung Phones

Google Drive is a safe place for all your files and puts them within reach from any smartphone, tablet, or computer. Files in Drive – like your videos, photos, and documents – are backed up safely so you can’t lose them. Once there, you can easily invite others to view, edit, or leave comments on any of your files or folders. For Blu-ray collectors, backing up your Blu-ray movies to Google Drive could be a goog beginning, then you can watch your favorite movies on your Samsung tablets, smartphones on the go. But how to backup Blu-ray movies? Just keep reading for an easy tutorial.

In fact, to get the job done, you need a super assistant - a Blu-ray copier. It is hard to get satisfactory one in the spotty market, so here comes this post. A powerful and professional Blu-ray copier/ripper called Pavtube BDMagic which is created for backing up Blu-ray movies. This program (available for Windows and Mac users) features high efficiency and seamless conversion. With it, you can easily rip and convert Blu-ray to Google Drive compatible MP4, MOV, AVI, WMV, FLV files with fast speed and excellent output quality for playback on your Samung phones on the move. Moreover, this utility can also provides optimized presets for iPad, iPhone, Samsung, Xbox, PS4, HD TVs and more.

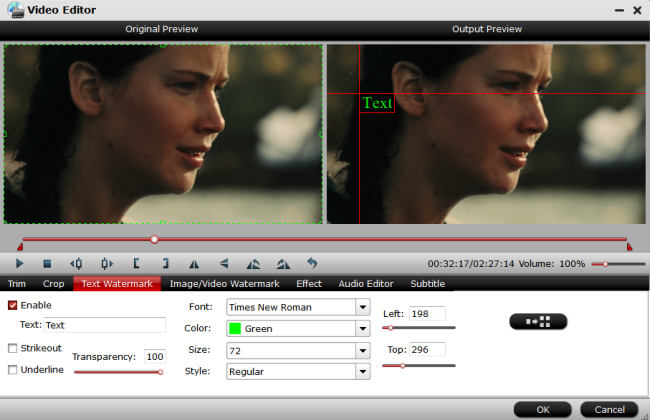
Furthermore, this Blu-ray copier also works as an easy-to-use video editing tool. You can add external subtitles to your Blu-ray movies for easier understanding or foreign language learning, vice versa, extracting audio from Blu-ray movie is also available here. You also can split the large file into several parts, the reverse is also true. For those people who love creating some movie trailers, you can use this program to trim the movie to get one part of the movie you desired. Welcome to download our product and try it.

win try mac try

How to rip Blu-ray to Google Drive friendly video for uploading and sharing

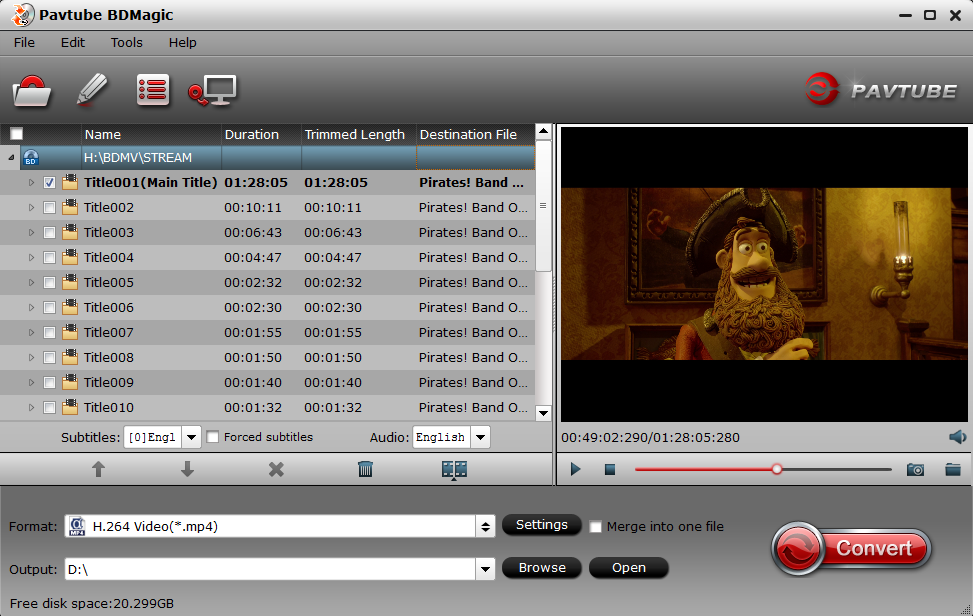
Step 1: Load Blu-ray movies

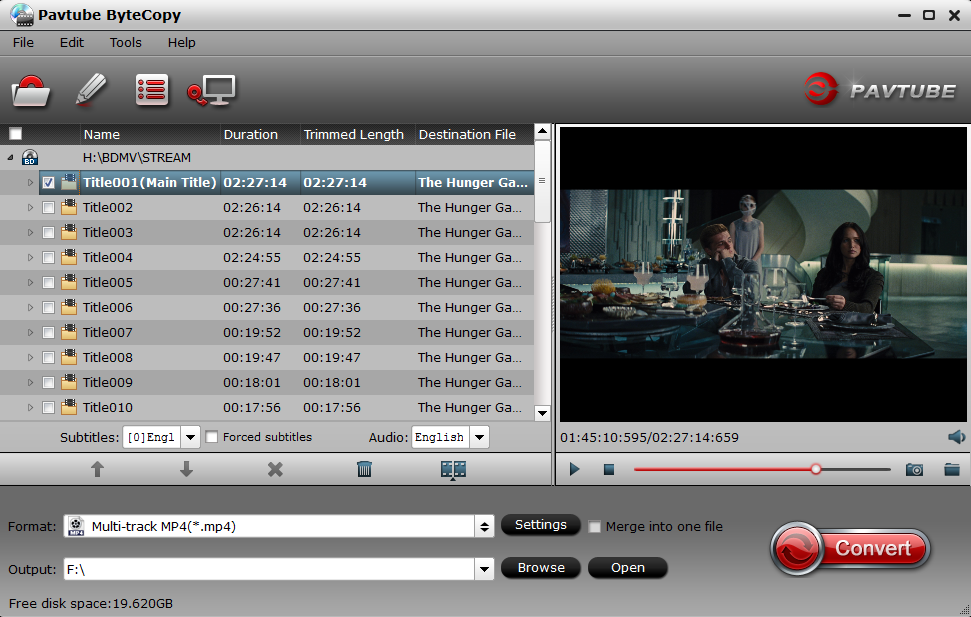
Launch the program on your computer, insert your Blu-ray disc into your computer's optical drive, click "File" > "Load from disc" to load commercial Blu-ray disc with region protection to the application.

Tip 1: If you are using trial version, it will be free but output video with watermark at the center. If you have registration code, just login it in.

Tip 2: You also can choose to rip Blu-ray with forced subtitle. Just specify English in "Subtitle" pull-down list, and then check "forced subtitles" before converting. When "forced subtitles" is checked, the subtitles appear on the screen only when foreign languages (i.e. Francais) other than English are spoken.

load blu ray

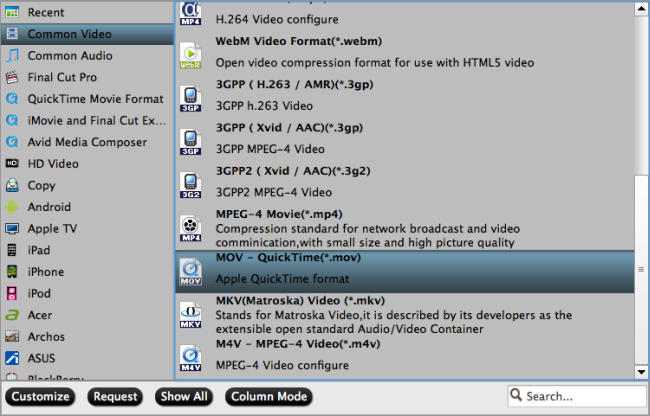
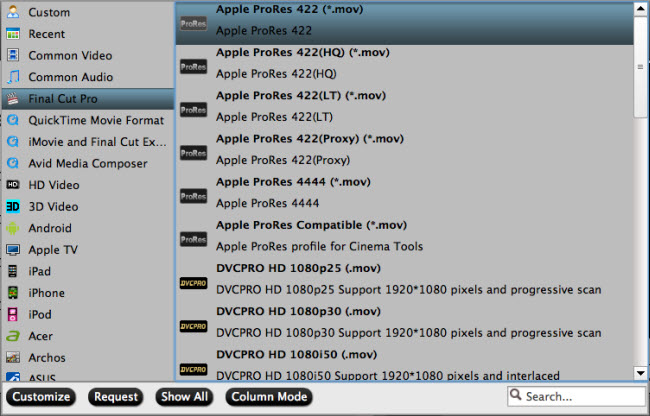
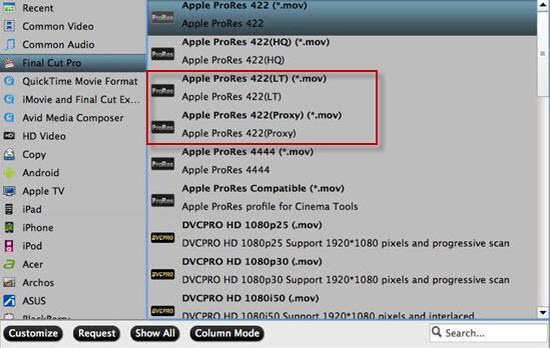
Step 2. Select output format compatible with Google Drive

Just click "Format", navigate to "HD Video"--> "H.264 HD Video". If you prefer higher definition output formats, you can choose "H.264 High Profile Video(*mp4)" from "Common Video".

h.264

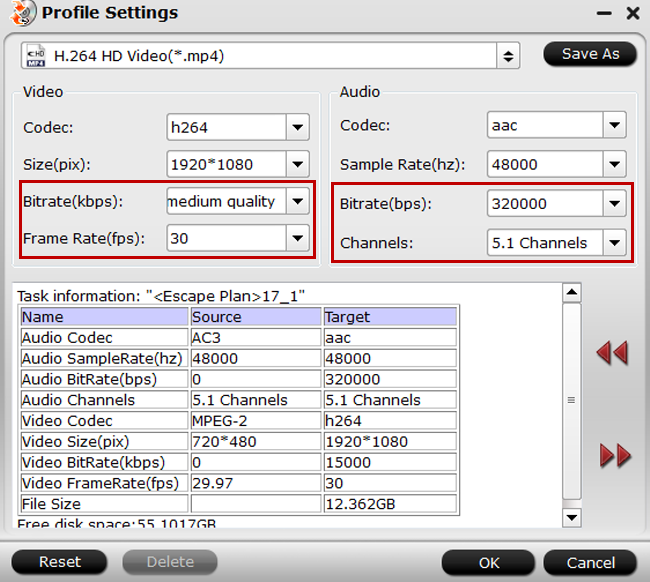
Tips: Google Drive only provides free 15GB. So if your media player support H.265, you'd better choose H.265 format, as the size of H.265 is much smaller than H.264. Besides, you can also adjust size and bitrate in the "setting" to lower the size of your converted video. What is more, it allows you trim video footage to choose one part of your movie to share on your Facebook or Google+ or other Community.

Image result for site:multipelife.com bdmagic h.264 settings

Step 3. Start to Convert Blu-ray to Google Drive for Playback on Samsung TV

Click on the button "Convert" on main interface to let this Blu-ray converter to convert Blu-ray movie to Google Drive supported video format. After conversion, you can click "Open" to get the generated file then transfer the file to your Google Drive, you also can put the converted files to USB stick then watch Blu-ray movies on Samsung TV via USB port.

Wednesday, February 21, 2018

Edit DJI Mavic Air 4K Video with iMovie

As the most portable DJI drone, the Mavic Air houses a 3-axis gimbal to shoot 8K Sphere panoramas, HDR photos, 4K 30 fps 100 Mbps video, and slow-motion video in 1080p at 120 fps. For Mac users who are looking for a free but professional editing software to handle the DJI Mavic Air 4K video, iMovie can be your best choice. Then how about the workflow of Mavic Air 4K video with iMovie?

Can iMovie native import Mavic Air 4K video

Apple has also updated iMovie 10.1 for Mac with support for 4K editing, in addition, the 4K H.264/MOV video shot with Mavic Air is also included in iMovie supported editing formats. However, it is well known that H.264 is a good delivery file format but no a good editing format. In addition, if your Mac computer doesn't meet the minimum requirements to edit 4K video, you won't get a smooth editing workflow.

Best editing codec for iMovie editing Mavic Air 4K video

For those people who wish to get a high quality and high performance editing workflow of Mavic Air 4K video with iMovie on underpowered computer, it would be much idea for you to transcode and compress Mavic Air 4K to iMovie favorable less processor-intensive editing codec - Apple Intermediate Codec (AIC) with either 1080p or 720p file resolution.

Here, you can download Pavtube Video Converter for Mac to directly generate Apple Intermediate Codec from Mavic Air 4K video. The program supports batch conversion mode, so that you can load multiple Mavic Air 4K video into the application for conversion at one time to save your precious time.

Related article: Import Mavic Pro 4K to FCP X | Edit Mavic Pro 4K with PPC on Mac | Compress Mavic Pro 4K to 1080p

The application not only assists you to encode Apple Intermediate Codec efficiently from Mavic Air 4K video, but also assists you to downscale Mavic Air 4K to 1080p or 720p so that you can get a smooth editing workflow even on slow Mac computer.

Pavtube Video Converter for Mac has perfect compatibility with the new macOS High Sierra, macOS Sierra, Mac Mac OS X El Capitan, Mac OS X Yosemite and Mac OS X Mavericks, etc. It is very simple to use, anyone can learn to use it in minutes. What's more, it produces high quality conversion results with better video/audio quality.

Step by Step to Transcode and Compress Mavic Air 4K to iMovie 1080p AIC

Step 1: Load Mavic Air 4K video.

Download the free trial version of the program. Launch it on your computer. Click "File" menu and select "Add Video/Audio" or click the "Add Video" button on the top tool bar to import Mavic Air 4K video into the program.

Load Mavic Air 4K video

Step 2: Choose output file format.

From "Format" drop-down option, choose iMovie best editing codec by selecting "iMovie and Final Cut Ex..." > "Apple Intermediate Codec (AIC)(*.mov).

Output iMovie best favorable AIC editing codec

Step 3: Compress 4K to 1080p.

Click "Settings" on the main interface to open "Profile Settings" window, from "Size(pix)" drop-down list, choose "1980*1020" or "1080*720" to compress 4K to 1080p.

Step 4: Edit Mavic Air 4K video.

By default the Edit icon is grayed out. To activate the Edit menu, you have to select an item first. When a video or movie is selected, click the pencil like Edit icon on the left top tool bar to open the video editor window, here, you can play and preview the original video and output effects. Also you can flip or rotate video, trim, crop, add watermark, apply special effect, edit audio or insert external subtitle.

Edit Mavic Air 4K video

Step 4: Start the conversion process.

After all the settings is over, go back to the main interface and hit right-bottom "Convert" button to start to convert and compress Mavic Air 4K video to iMovie best compatible Apple Intermediate Codec editing format with 1080p file resolution.

When the conversion is completed, launch iMovie on your Mac computer to import converted video to iMovie for smooth editing workflow on either fast or slow Mac computer.

Wednesday, February 14, 2018

Import Video_TS to FCP X

What is Video_TS folder?

When you insert a video DVD into your computer, you can open the DVD and view the contents just like a folder on your hard drive. Most video DVDs have two folders in the root directory - AUDIO_TS and VIDEO_TS. The VIDEO_TS folder contains all the DVD's video data and playback information. There are three kinds of files inside a Video_TS folder: VIDEO_TS.IFO, VIDEO_TS.BUP, and VIDEO_TS.VOB.

Import Video_TS folder to FCP X?

Obviously, Video_TS folder doesn#8217;t natively work with FCP X, you must convert the Video_TS folder to FCP X supported editing file formats. As a matter of fact, what you need is simply a Mac Video_TS Converter. The program we highly recommend to you here is called Pavtube ByteCopy for Mac, it has perfect compatibility with the all Mac OS including macOS High Sierra, macOS Sierra, Mac OS X El Capitan, Mac OS X Yosemite, Mac OS X Mavericks, etc.

Related article: Import Phantom 4 4K to FCP X | Import NX1 H.265 to FCP X | Can FCP Support DJI Osmo 4K Video

Apart from the Video_TS folder, the program also provides loading support for DVD disc, IFO/ISO image file and also Blu-ray disc/BDMV folder/ISO image file. With this powerful yet simple to use application, you can not only transcode Video_TS to FCP X editable digital file formats such as MP4, MOV (QuickTime), DV, HDV, etc file formats, but also directly output FCP X most favorable high quality and high performance editing codec - Apple Prores in different file types including Apple Prores 422, Apple Prores 422 HQ, Apple Prores 422 Proxy, Apple Prores 422 LT, etc for different editing needs on either powerful or underpowered Mac computer.

Step by Step to Import and Edit Video_TS Folder with FCP X

Step 1: Load Video_TS folder.

Download, install and run this Video_TS Converter on your Mac computer. For loading DVD Video_TS Folder, just click "File" > "Load from folder", you can also load DVD disc by clicking "File" > "Load from disc" or load DVD IFO/ISO image by clicking "File" > "Load IFO/ISO".

Load Video_TS folder

Step 2: Define the output format.

Clicking the Format bar, from its drop-down list, you can choose one of FCP X best compatible editing formats such as "MOV - QuickTime(*.mov)" under "Common Video" main category.

Output FCP X best compatible editing formats

If you wish to achieve a high quality and high performance editing workflow of Video_TS with FCP X, just output FCP X most preferable "Apple Prores 422(*.mov)" under "Final Cut Pro" main category to get the optimal editing experience.

Output FCP X most favorable Apple Prores editing codec

Step 3: Edit Video_TS files with built-in editing options.

By default the Edit icon is grayed out. To activate the Edit menu, you have to select an item first. When a movie title or chapter is selected is selected, click the pencil like Edit icon on the left top tool bar to open the video editor window, here, you can play and preview the original video and output effects. Also you can flip or rotate video, trim, crop, add watermark, apply special effect, edit audio or insert external subtitle.

Edit Video_TS files

Step 4: Begin the final conversion process.

After all setting is completed, hit the "Convert" button at the right bottom of the main interface to begin Video_TS to FCP X supported editing formats or most preferable Apple Prores editing codec transcoding process.

When the conversion is finished, click "Open Output Folder" icon on the main interface to open the folder with generated files. Then just feel feel to import converted video to FCP X for professional post editing workflow.

Tuesday, February 6, 2018

Transcode H.265 to Prores

The relatively new H.265 High Efficiency Video Coding (HEVC) offers roughly double the compression ratio for the same quality. This means that a video file encoded with HEVC can occupy half the space of its H.264 equivalent with no noticeable change in quality, or the same amount of space with improved quality. H.265 is adopted for shooting 4K quality resolution by more and more cameras such as Samsung NX1/NX500, DJI Phantom 4 Pro, DJI Inspire 2, GoPro Hero 6 and even some iPhone models such as iPhone 7/7 Plus/8/8 Plus/X. However, the problem is that many editing application lacks the ability to handle this new editing codec. Even both Premiere Pro CC has officially claimed importing support for H.265 video with a resolution of up to 8K, however, unless you owns a very powerful computer, you won't get a smooth editing workflow, since the decoding of H.265 video especially 4K H.265 video is very processor intensive. The good news is that by encoding H.265 to Prores codec, you can get many great benefits listed below during the post editing workflow with many professional NLE applications.

Great advantages of Prores codec when using as an editing codec

- Perfect compatibility with various popular NLE software including Premiere Pro CC, Final Cut Pro X, Avid Media Composer, Lightworks, etc.
- Supports all of the current frame size such as SD, HD, 2K, 4K and 5K
- As a 10 bit codec, Apple Prores can process a lot of more color data and make the color correction process easier.

Best tool to encode H.265 to Prores on PC and Mac

When you are searching on the market, you may find that there are many Prores Converter can assist you to transcode H.265 to Prores. However, some may only be available on Mac platform, others may lacks the ability to perfectly handle H.265 codec especially 4K H.265 codec.

Related article: Edit 4K Prores in Vegas Pro | GoPro 4K to Prores 4K in FCP | 1080p MKV to Prores 422 HQ for FCP 

Fortunately, here comes Pavtube Video Converter for Mac, a cross-platform application that's can be downloaded and installed on both Windows (get Windows version) and Mac platform. The program has perfect importing support for both HD/4K H.265 codec wrapped with different container file formats including MP4, MOV and MKV. It allows you to directly convert H.265 to Apple Prores codec in different file types including Apple Prores 422, Apple Prores 422 HQ, Apple Prores 422 LT, Apple Prores 422 Proxy, Apple Prores 4444, etc to satisfy your different editing demands. If you have a powerful computer and you wish to do more effects editing, just choose the Apple Prores 422, Apple Prores 422 HQ format, if you just want to do some rough editing on slow computer or for offline editing, the Apple Prores 422 Proxy or Apple Prores would be a good choice.

Step by Step to Transcode H.265 to Prores for NLE Editing

Step 1: Load H.265 files into the application.

Download the free trial version of the program. Launch it on your computer. Click "File" menu and select "Add Video/Audio" or click the "Add Video" button on the top tool bar to import source H.265 files into the program.

Load source H.265 files

Step 2: Define the output format.

Clicking the Format bar, from its drop-down list, select your desired Prores format according to your own needs.

Output Apple Prores 422 or 422 HQ format

Output Prores 422 or 422 HQ format

Output Apple Prores 422 Proxy or LT format

Output Apple Prores 422 Proxy or LT format

Step 3: Begin the conversion process.

After all setting is completed, hit the "Convert" button at the right bottom of the main interface to begin the conversion process from H.265 to Prores with your desired file types.

When the conversion is finished, click "Open Output Folder" icon on the main interface to open the folder with generated files. Then you can get a smooth workflow of Prores in NLE editing software.