Thursday, July 13, 2017

How to Rip Blu-Ray in the Right Way?

For a long time I have ripped my movies for home use and have been fighting through many different programs of swinging character and swinging prisms. Most functionally work for specific purposes or have the great advantage of being free, but no one can do all tasks as well. There are programs like Makemaker that makes MKV files of your DVDs but can not handle Blu-Ray, Pavtube iMedia Converter that manages Blu-Ray but not in lossless format or with multiple audio and subtitle or Handbrake that's free but Which can not combine sections on a Series DVD / Blu-Ray and is quite slow.

For a long time I have also experimented with file formats and found that MKV is just becoming?the most useful format in all respects, so this guide focuses on an end result in MKV.

Additionally, I am tired of having to install different software to handle the different discs I would like to rip and should remember the different settings and procedures for each program.

I have chosen that ByteCopy from Pavtube should be my favorite tool as it has some obvious benefits when it comes to ripping. You can rip Blu-Ray and DVD on 2 methods. Either as lossless copy or as a converted encoded file with a less natural quality loss, but more importantly you can select multiple audio and subtitle tracks and you can encode them individually in the entire file to match your hardware setup as best as possible.?I personally rarely use lossless as it takes too much and would like my Blu-Ray into a 4-5 GB file for network playback for my ATV4.

Pavtube ByteCopy

So what can ByteCopy do? It looks like many of the other programs on the market when it rips and copies Blu-ray Disc and DVD movies to MKV. ByteCopy plays an irreplaceable role as the exclusive Blu-ray ripper that converts the main movie on Blu-ray, audio tracks and subtitles exactly as you want without compromising video and audio quality. When it encoder and diminish Blu-ray content, CUDA acceleration is turned on by default whenever possible and it gives a significant boost in speed.

Export file format: MKV
Video: H.264 / MPEG-4 AVC, VC-1, MPEG pass-through; H.264, Xvid, MPEG, VC-1 encoded
Audio: Dolby Digital, Dolby Digital Plus, Dolby TrueHD, DTS Digital, DTS-HD High-Def, DTS-HD MA Pass-through; Dolby Digital 5.1, DTS, AAC, MP3 encoded.

Method 1

Step 1. Blu-ray rip in Lossless Mode, ie a rip of Blu-Ray main movie with all original video, audio and subtitle tracks without changing anything. For those who have a lot of disk space and who do not want to compromise on anything. Start ByteCopy and load your disk by clicking the DVD / Blu-Ray button. The movie is now loaded (copy protected or not) and the main movie is automatically selected, but everything can be selected. Useful if you have plenty of space.

Load Blu-ray movies

Step 2. Click the converter button to start riping your Blu-Ray to MKV, with the main file, all audio and subtitle tracks. If you have finished ripping, you can click "Browse Export Path" to find the MKV file. TIP! You can change the output path under settings in the software. Then just wait

Start Blu-ray to MKV Ripping process

Under lossless (default) mode, Pavtube ByteCopy will convert Blu-ray movies to MKV without changing anything. All it takes is to rip the main movie file from the disk and pack it in an MKV container. You get lossless quality with all subtitles and audio tracks, because original video, audio and subtitles are preserved. In addition, you also keep chapter marks.

Method 2

Certainly the method I use most. It shreds the disc with the subtitles and audio tracks you want, while compressing the file to a somewhat more handy size without compromising on quality compromises. I will show you how to do this, but you can change the different parameters for what suits you best. I rip my movies for a setup with an NAS that streams to a jailbreaked ATV4 with Firecore media player installed. This gives the smallest file the exact content I want.

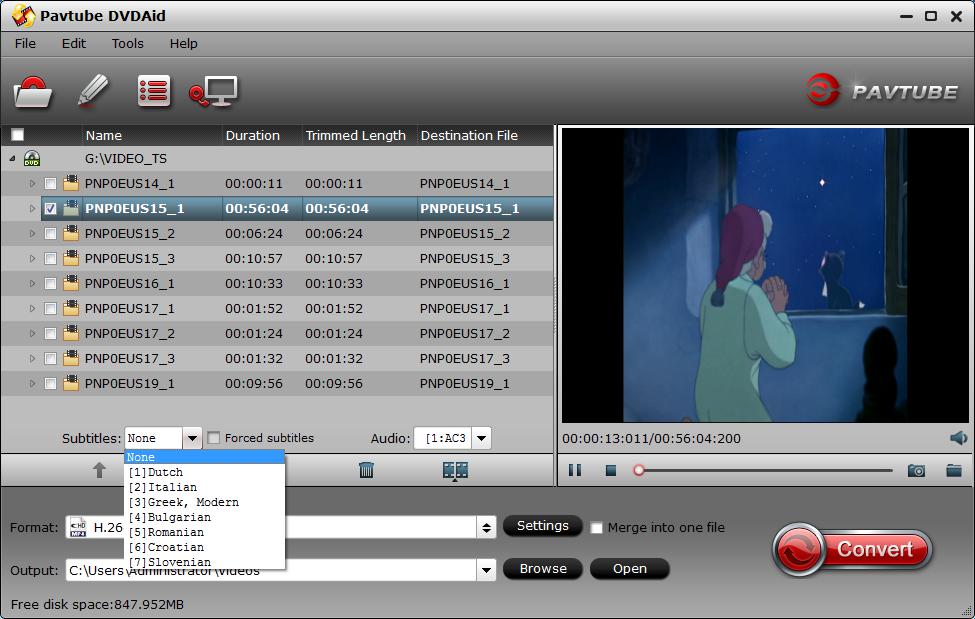
Step 1. Load the file from ByteCopy. The main movie is automatically selected.

Load Blu-ray movies

Step 2. Select the title in the window and click edit disk. You can now choose which audio tracks and subtitles you want. TIP! You can set your selection by default in ByteCopy's settings, so they are remembered each time. In addition, you can also select a specific player you want to rip to, so ByteCopy converts light and subtitles to file formats that are compatible with your player. I always use lossless and put my own choice of file types.

Select desired Blu-ray subtitles and audio tracks

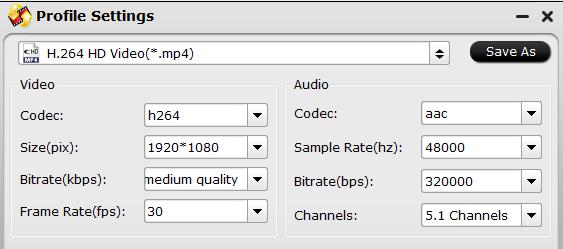
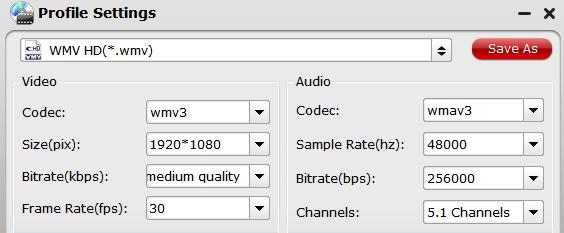
Step 3. If it's only a specific part you want to rip (for example, only main), go directly to the selected track and click Title Settings. Here you can choose to rip in Full HD, or as I do just below HD. At Full HD, I recommend bitrate of 8000, at HD you can reach 6000. Is it a DVD you rip, then choose 720x576 in Size and you can beat a bitrate of around 2000. Remember to tick the Enco if you Will change the resolution and bitrate.

Customize video settings

Step 4. Next turn is the sound. I always start by clicking uncheck All, as I usually only want Danish and English audio. After checking the checkboxes you want, you can choose whether you want the Encode audio, or just keep it as it is in Source. I always keep it as ATV4?can handle DTSHD for a stereo TV speaker, but for some, it may be necessary to convert to a stereo track.

Remove unwanted audio tracks

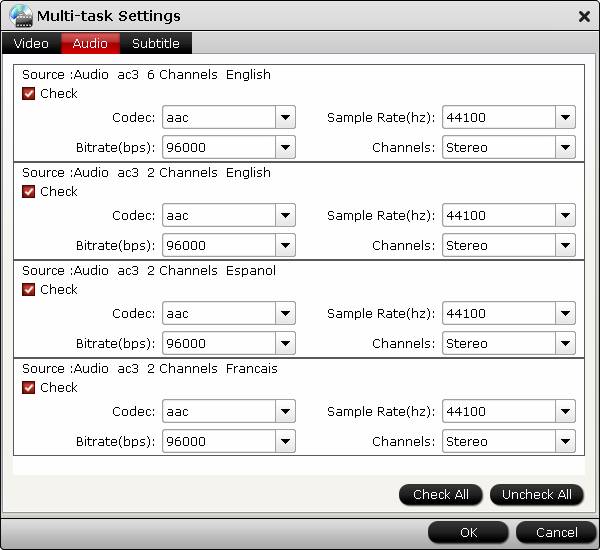
Step 5. Then we are on subtitles. Again Unchecl All and select the subtitle (s) you want. I always choose Danish only, but some may want others too. When done, click OK, and click the MKV button to begin.

Remove unwanted subtitles

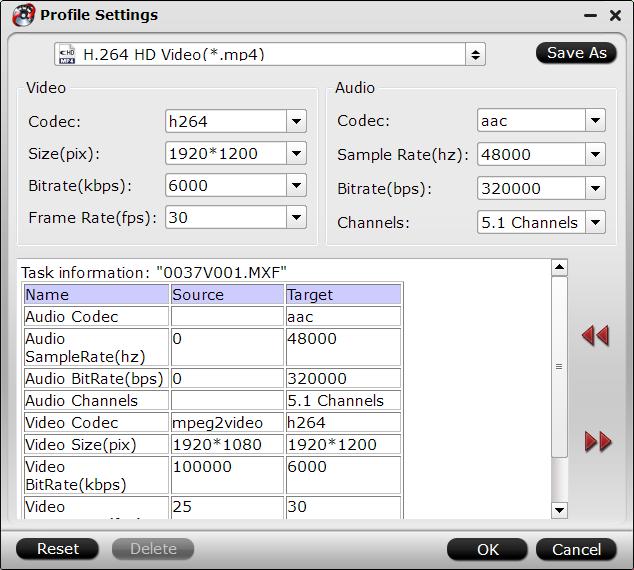
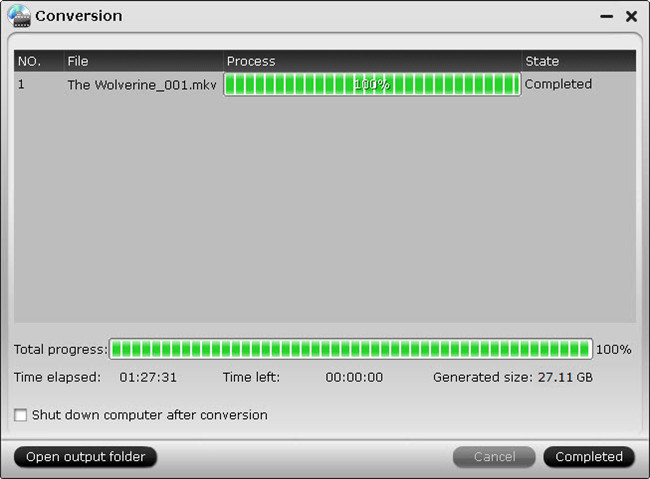
Then the task is created and ByteCopy starts calculating time and size based on your choices and the power of your computer. As you can see in the screenshots below, ByteCopy is quite accurate in its calculations, and only diverges a very small amount. The time you see listed is on a 2012 13 "Macbook Air, and I think it's quite good to be able to rip and compress / encode a Blu-Ray disc in less than 2 hours. Is it just a DVD, then we talk for half an hour.

Start Blu-ray movie copying process

ByteCopy is by far the best and fastest program I've tried. You can download a trial version from Pavtube, either ByteCopy for Windows or ByteCopy for Mac OS X. You can make 7 lossless rips with the trial and want to rip and encode to get a watermark on the movie. You can purchase the software for only $ 42 including unlimited lifetime upgrades. Enjoy.

Wednesday, July 12, 2017

Transfer Video/Music to Galaxy Book 12

The Samsung Galaxy Book 12 tablet offers perfect performance thanks to its latest 7th Gen Intel® Core™ i5 Processor, 4GB RAM, a 128GB solid-state drive. In addition, the Super OLED screen makes watching movies and music videos on it an absolute pleasure. Want to enrich your  Samsung Galaxy Book 12 with all your favorite movies/music downloaded from online sites, ripped from disc or shot with device recorders, but have no ideal how to make that realized, the following article will show you how to transfer supported and unsupported video and music to Samsung Galaxy Book 12.

Samsung Galaxy Book 12 supported file formats

Audio playing format:
MP3,M4A,AAC,WAV,WMA,FLAC

Video playing format:
MP4,M4V,3GP,WMV,ASF,AVI,MKV

If the video and music that you try to transfer and play on Galaxy Book 12 are those formats that are supported by this tablet listed above, you can then directly use the supplied USB connector to connect your Galaxy Book 12 directly to your computer to transfer music, video and other content files. Following are the detailed steps:

Step 1: Connect your Galaxy Book 12 to your computer using the supplied USB/charging cable.

Tips: The first time you attach the device to a computer, the device driver software will automatically install on the computer.

Step 2: Click Open device to view files.

Step 3: Swipe down to open the Notification panel. Drag the status bar down to display the notification panel.

Step 4: You will see either Connected as a media device or Connected as a camera.

The files on your device can now be accessed via your computer.
- For most transfers, you will want to use Connected as a media device.

- To change the option, touch other USB options below the notification panel to open the USB computer connection window, and then touch the desired option.

Step 5: On your computer, navigate to your device and click to open.

Step 6: Select your Tablet for internal device storage or select Card if you have microSD card installed on your device.

Step 7: For this example, we will transfer files to microSD card. Select a folder or create a new folder (for example, Music for songs and albums) to copy files from your computer.
When you are done, disconnect your device from your computer.

Step 8: The transferred files are now saved to your device.

Transfer and play unsupported video and music on Galaxy Book 12

If the music or video are in the formats of MOV, FLV, 3GP, WebM, AVCHD, MXF, XAVC, XAVC S, H.265, Prores, AAC, AC3, DTS, DTS-HD, MKA, ALAC, etc, you will fail to open them with Galaxy Book 12. To fix those format incompatible issue, you can download this powerful Galaxy Book 12 Video Converter - Pavtube Video Converter to comprehensively convert all the incompatible file formats listed above and also other formats to Galaxy Book 12 playable video and audio file formats. The program supports batch conversion mode, you can load multiple video and music files into the program for conversion at one time.

Adjust output profile parameters

To get better output video and audio quality, click "Settings" on the main interface to open "Profile Settings" window, here, you can flexibly choose or specify exactly the profile parameters including video codec, resolution, bit rate, frame rate, audio codec, bit rate, sample rate, channels, etc as you like.

Related article: Play MPG on Galaxy S5 | Watch HD Videos on Galaxy Tablet | Transfer Media Files to Galaxy S4

Adjust output video aspect ratio for Galaxy Book 12

As the main display resolution of Galaxy Book 12 is 2160 x 1440, it also means the screen display aspect ratio of Galaxy Book 12 is 3:2, if the video that you try to view on Galaxy Book 12 use other aspect ratio, then there will be black bars around the video. To fix this issue, you can use the "Crop" function offered by the program to change output video aspect ratio to let it adapt with your Galaxy Book 12.

For Mac users, please download Pavtube Video Converter for Mac to perform the same conversion process on macOS Sierra or previous version.

How to Convert Unsupported Video/Music to Galaxy Book 12?

Step 1: Load video or music files into the program.

Download the free trial version of the program. Launch it on your computer. Click "File" menu and select "Add Video/Audio" or click the "Add Video" button on the top tool bar to import video or music from your computer local drive into the program.

Load video or music files into the program

Step 2: Choose output file format.

Clicking the "Format" bar, from its drop-down list, select one of Galaxy Book 12 playable file formats such as "H.264 HD Video(*.mp4)" under "HD Video" main category.

Choose output file format

Step 3: Adjust output profile parameters.

Click "Settings" on the main interface to open "Profile Settings" window, here, you can flexibly choose or specify exactly the profile parameters including video codec, resolution, bit rate, frame rate, audio codec, bit rate, sample rate, channels, etc as you like to get better output video and audio quality.

Adjust output profile parameters

Step 4: Adjust output video aspect ratio.

Go the "Crop" tab in the "Video Editor" Window, switch to the "Advanced Mode". To change output video aspect ratio, there are several aspect ratios for you to choose from, including 16:10, 16:9, 5:4, 4:3, 3:2, and 2:1, you can choose your Galaxy Book 12 accepted aspect ratio such as 16:9 or 3:2. Once you select a "Display aspect ratio", the "green crop frame" will keep this ratio to crop video and you are able to preview the final effect in real time. If you want to keep the same aspect ratio in your final output files, do remember to set the Video "Size (pix)" in "Settings" section as the same ratio as display aspect ratio.

Adjust output video aspect ratio

Step 5: Begin the conversion process.

After all setting is completed, hit the "Convert" button at the right bottom of the main interface to begin the conversion process from video/music to Galaxy Book 12 compatible file formats conversion process.

When the conversion is finished, click "Open Output Folder" icon on the main interface to open the folder with generated files. Then following the steps listed above to transfer video/music to Galaxy Book 12.

Tuesday, July 4, 2017

Watch Blu-ray Movies on Samsung Chromebook Pro/Plus

The sleek and metal body of Samsung Chromebook Pro and Plus are comfortable to carry as a tablet and easy to fit in your bag while you are re on the go. Wish to enjoy your favorite high definition Blu-ray movies on Chromebook Pro/Plus wherever you go. The following part will show you how to make that realized.

How to play Blu-ray movies on Samsung Chromebook Pro/Plus?

In our previous article, we have talked about the issue of viewing DVD movies on Samsung Chromebook Pro. We also know that the Samsung Chromebook don't have a DVD drive, in addition, there is also no special DVD decoding software for the Chrome OS used by Samsung Chromebook. But it doesn't mean that there is no way to play DVD movies on Samsung Chromebook. The good news is that you can rip DVD into digital file formats for playing with VLC media player (which is now available to be downloaded on Chromebook) or convert DVD to Samsung Chromebook compatible file types for viewing with its buillt-in video player app. For those people who wish to get Blu-ray movies on Samsung Chromebook Pro/Plus, this method is also the most reliable and simple one. But what you will need is not a DVD Ripper but also a powerful Blu-ray ripper.

Rip Blu-ray movies for Samsung Chromebook Pro/Plus playing

Samsung Chromebook Pro/Plus supported file types

Following are the file types and codecs that work on Chromebook Pro/Plus

Media: .3gp, .avi, .mov, .mp4, .m4v, .m4a, .mp3, .mkv, .ogv, .ogm, .ogg, .oga, .webm, .wav
Codec:

Container Video codec Audio codec
ogv Theora -
webm VP8 Opus
VP9 Vorbis
mp4 H264 -
MPEG4 -
mov MPEG4 -
H264 -
avi MPEG4 MP3
Divx MP3
XVID MP3
3gp H264 AAC
MPEG4 AMR-NB

Best Blu-ray movies to Samsung Chromebook Pro/Plus ripper

If you are looking for a powerful Blu-ray ripper program to swiftly rip Blu-ray movies to Samsung Chromebook Pro/Plus readable file formats and codec with perfect quality. We highly recommend Pavtube ByteCopy to you. The program can automatically and powerfully bypass all Blu-ray copy protection and region code with its built-in decrypter, so that you can then freely rip the non-protected Blu-ray movies to Chromebook Pro/Plus playable file formats and codec listed above.

To get better output file quality for Chromebook Pro/Plus, you can flexibly tweak output profile parameters including video codec, resolution, bit rate, frame rate, audio codec, bit rate, sample rate, channels, etc in the program's profile settings window.

Adjust output video aspect ratio

Both Chromebook Pro and Plus utilize a display screen aspect ratio of 3:2, while the Blu-ray movies use an aspect ratio of 16:9, which doesn't match with your Chromebook Pro and Plus. When you try to play the output video with an aspect ratio of 16:9 on Chromebook Pro and Plus with an aspect ratio of 3:2, there will be black bars around the video frame, the good news is that you can easily fix this issue by change output video aspect ratio to 3:2 with the crop function in the video editor window.

For Mac users, you can download Pavtube ByteCopy for Mac to rip Blu-ray movies for Chromebook Pro/Plus playing on macOS Sierra, macOS High Sierra.

Get Pavtube ByteCopy with 20% off discount, coupon codec: 45K2D47GJH

How to Rip Blu-ray Movies for Samsung Chromebook Pro Playing?

Step 1: Import Blu-ray Movies.

Insert the Blu-ray disc into your computer's Blu-ray drive. If your computer doesn't ship with a drive, you will need to purchase an external USB Blu-ray drive to read on the data on Blu-ray disc. Then press "File" > "Load from disc" option on the main interface, alternatively, you can also import Blu-ray folder or Blu-ray ISO files with the program.

Load Blu-ray movies

Step 2: Define the output format.

Clicking the Format bar, from its drop-down list, select one of Samsung Chromebook Pro/Plus playable file formats such as "H.264 HD Video(*.mp4)" under "HD Video" main category.

Output Chromebook Pro/Plus playable file formats

Step 3: Adjust output video aspect ratio.

Go the "Crop" tab in the "Video Editor" Window,  switch to the "Advanced Mode". To change output video aspect ratio, there are several aspect ratios for you to choose from, including 16:10, 16:9, 5:4, 4:3, 3:2, and 2:1, you can choose Chromebook Pro/Plus accepted 3:2 aspect ratio. Once you select a "Display aspect ratio", the "green crop frame" will keep this ratio to crop video and you are able to preview the final effect in real time. If you want to keep the same aspect ratio in your final output files, do remember to set the Video "Size (pix)" in "Settings" section as the same ratio as display aspect ratio.

Adjust output video aspect ratio

Step 4: Begin the conversion process.

After all setting is completed, press the "Convert" button in the right-bottom and begin Blu-ray to Samsung Chromebook Pro/Plus playable file formats ripping process.

When the conversion is over, click "Open output folder" to pop out the converted files.

Tips: As the internal storage of Chromebook is very small, it would be much ideal for you to transfer converted Blu-ray movies to external USB drive or thumb drives for playing on Samsung Chromebook Pro/Plus via its built-in media player or VLC media player.

Wednesday, June 28, 2017

Watch DVD Movies on Samsung Chromebook Pro

The 12.3-inch Samsung Chromebook Pro is a solid hybrid that brings up one step closer to the perfect marriage between Chrome OS and Android. The sleek metal body is as comfortable to carry as a tablet and easy to fit in your bag while you're on the go. Want to take your favorite DVD movies with your on your Samsung Chromebook Pro when you are out for traveling? How about the possibility to play DVD on Samsung Chromebook Pro? Have more interest, just read on..

Can Samsung Chromebook Pro play DVD disc?

Do Samsung Chromebook Pro have a DVD disk drive?

Chromebooks don't have DVD drive, but you can connect an external disc drive via USB to access files stored on DVDs.

Can Samsung Chromebook Pro play DVD?

Although it is possible to connect an external USB drive to your Chromebook, however, you can not currently watch DVD movies by default in Chrome OS. The main reason is that the playback of DVD Video requires special decoding software and codecs to work. Google has not licensed this software and included it with Chrome OS.

Solution to play DVD with Samsung Chromebook Pro

The good news is that VLC, one of the best free programs for local media playback, now runs on Chromebooks you can download it from the Chrome Web Store for playing various video and audio file types. However, as VLC for Chrome OS lacks the ability to access DVD drives, you will need to help of following 2 programs to get DVD movies played on Samsung Chromebook Pro with VLC media player.

Solution 1: Using crouton along with VLC

watch video DVD movies using crouton along with software like VLC, but this requires switching your Chromebook into developer mode and installing a secondary operating system, something that is not recommended for everyday Chromebook users.

Solution 2: Use DVD Ripping software

Although VLC can't access DVD movies from DVD drive, but it can play movies stored on USB flash drive or external hard drive or microSD cards, therefore, you can use a DVD Ripper software to rip or convert DVD to Samsung Chromebook Pro playable digital video and audio formats listed below for viewing on the Chromebook with VLC media player from external drives.

Here, you can get the job easily completed with a simple to use yet powerful application called Pavtube DVDAid, the program can powerfully bypass all DVD copy protection and region code from the disc. In addition, it also keeps constant update with perfect support for the new encryption used on many recently released DVD disc. You can then freely rip the non protected data on DVD to Samsung Chromebook Pro readable video and audio file formats listed below:

Video/Audio container formats: 3gp, .avi, .mov, .mp4, .m4v, .m4a, .mp3, .mkv, .ogv, .ogm, .ogg, .oga, .webm, .wav

Codec

Remove subtitle and deinterlace video

Chromebook can't play video with subtitle or that is interlaced recorded, therefore, when ripping DVD to Samsung Chromebook Pro with subtitles using the program, you can select the "none" option under "Subtitle" drop-down list. In the video editing window, you can also tick off the "Deinterlacing" option to deinterlace interlaced video to get better output video quality.

Get Pavtube DVDAid with 20% off discount, coupon codec: 45K2D47GJH

Step by Step to Rip DVD for Samsung Chromebook Pro Playing with VLC?

Step 1: Import DVD Movies.

Download, install and run this DVD ripper. Inser the DVD disc into your computer optical drive. You can load DVD by clicking "File" > "Load from disc". Or load DVD Folder by clicking "File" > "Load from folder" or load DVD IFO/ISO image by clicking "File" > "Load IFO/ISO".

Load DVD movies

Tips: On the main interface, from "Subtitle" drop-down list, choose "

Step 2: Define the output format.

Clicking the Format bar, from its drop-down list, select one of Samsung Chromebook Pro playable file formats such as "H.264 HD Video(*.mp4)" under "HD Video" main category.

Output Samsung Chromebook Pro playable file formats

Tips: Click "Settings" to open "Profile" settings window, here you can flexibly tweak the output video codec, bit rate, frame rate, resolution, audio codec, bit rate, sample rate and channels according to your own needs.

Step 3: Deinteralce DVD video.

Open "Video Editor" window, under the "Effect" tab, select "Deinterlacing"to convert interlaced DVD movies into a progressive form so that you can enjoy a better and clear video effect.

Deinteralce DVD video

Step 4: Begin the conversion process.

After all setting is completed, press the "Convert" button in the right-bottom and begin DVD to Samsung Chromebook Pro playable file formats conversion process.

When the conversion is over, click "Open output folder" to pop out the converted files, then feel free to transfer converted files to a USB flash drive, external hard drive or microSD card to plug into your Samsung Chromebook Pro for playing with VLC media player.

Tuesday, June 20, 2017

View MP4 Files on Samsung Galaxy S8/S8 Plus

For media lovers, the first thing you'd probably want to do when you get your hands on the new Samsung Galaxy S8/S8 Plus is to watch videos on the move. The condition is that you happen to have some MP4 files downloaded from online video sharing sites or shot with your device recorders on your local hard drive, then you may wish to transfer and play the MP4 video on Galaxy S8/S8 Plus. The following article will show you how to make that realized easily.

Samsung Galaxy S8/S8 Plus supported file formats

Before going any further, first you should know what video and audio file formats can be viewed on Galaxy S8/S8 Plus. From Samsung's official page, we get the information that we can play the following file types on Galaxy S8/S8 Plus.

Video Playback format

MP4, M4V, 3GP, 3G2, WMV, ASF, AVI, FLV, MKV, WEBM

Audio Playback Format

MP3, M4A, 3GA, AAC, OGG, OGA, WAV, WMA, AMR, AWB, FLAC, MID, MIDI, XMF, MXMF, IMY, RTTTL, RTX, OTA, DSF, DFF

Hot Search: Blu-ray to Galaxy S8/S8 Plus | DVD to Galaxy S8/S8 Plus | ISO to Galaxy S8/S8 Plus

Can you play any MP4 files on Galaxy S8/S8 Plus?

Although both Galaxy S8/S8 Plus has included native playback support for MP4 file format. However, it is well known that MP4 is a multimedia container file format, which can be encoded with various different video or audio codec listed below:

Video codec: MPEG-1, MPEG-2, MPEG-4 (A)SP, H.264/MPEG-4, H.265/HEVC, VC-1/WMV, Real Video, Theora, Microsoft MPEG4 V2, VP8, MVC
Audio codec: MP3, WMA, AAC, AC-3, DTS,ALAC, DTS-HD

Your Galaxy S8/S8 Plus can only open the MP4 files that's compressed with its readable video or audio codec. To fix this problem, you can either download and install the following more powerful third-party video player for Galaxy S8/S8 Plus:
BSPlayer, MoboPlayer, MX Player, VLC Player for Android, RealPlayer
If you still fails to open the MP4 files with above listed third-party video player apps, you can download a powerful MP4 Video Converter - Pavtube Video Converter Ultimate to convert unsupported MP4 to Galaxy S8/S8 Plus readable video or audio file formats listed above.

To get better output video and audio quality for Galaxy S8/S8 Plus, you can flexibly adjust output profile parameters such as video codec, resolution, bit rate, frame rate, audio codec, bit rate, sample rate, channels, etc as you like.

Reduce MP4 file size for Galaxy S8/S8 Plus

To save more space for your Galaxy S8/S8 Plus, you can compress video with the program in 3 different ways: trim video to remove unwanted parts (no quality loss), lower video bit rate (lossy video compression) or reduce output file size/resolution(lossy video compression).

Get Pavtube Video Converter Ultimate with 20% off discount, coupon codec: 45K2D47GJH

Step by Step to Convert MP4 for Samsung Galaxy S8/S8 Plus Playback

Step 1: Add unsupported MP4 files into the program.

Run the program on your computer and click "File" > "Add Video/Audio" or "Add from folder" to add unsupported MP4 files into the program.

Load unsupported MP4 video

Step 2: Define output file format.

Tap on the "Format" bar, choose Samsung Galaxy S8/S8 Plus best compatible MP4 as output file format. To achieve a smooth video playback effect, it is idea for you to choose to output "H.264 HD Video(*.mp4)" under "HD Video" as final output file format.

Output Galaxy S8/S8 Plus supported file formats

Step 3: Reduce file size in 3 different ways.

Adjust output file size and bit rate

Open "Profile Settings" window, here you can reduce video file size by output file resolution or bit rate with small values.

Lower output video resolution and bitrate

Trim video file size

Click "Video Editor" icon on the main interface to open video editing window, switch to "Trim" tab, drag the slider bars to set the start time and end time to select only your wanted parts to be converted.

Trim video file size

Step 4: Start the conversion process.

After all setting is completed, hit the "Convert" button at the right bottom of the main interface to begin the conversion process from MP4 to Samsung Galaxy S8/S8 Plus supported file formats and settings conversion process.

When the conversion is finished, click "Open Output Folder" icon on the main interface to open the folder with generated files. Then follow the steps below to transfer video from computer to Galaxy S8/S8 Plus:
1. Windows users should download and install the USB drivers for the Galaxy S8/S8 Plus. Mac users can download and install Android File Transfer.
2. Connect the device to an available USB port using the included USB cable.
3. A prompt will appear on the screen of the phone that says "Connected as media device" or "Connected for charging". Drag the notification area down, tap it, then make a selection based on what you wish to do with the device.
- Transferring media files - Connect the phone to your computer to transfer files. Windows users can look under Computer and find the device listed under Portable Devices.

Wednesday, June 14, 2017

Watch ISO Files on Samsung Galaxy S8/S8 Plus

Your hard drive are full of ISO image files ripped from Blu-ray/DVD disc. It won't be difficult for access those ISO files on computer via free ISO video player apps like VCL media player, 5K Player, etc or mount via virtual drive tools like Daemon Tools. For those people who have just got a Galaxy S8 or S8 Plus, how about the possibility to watch ISO files on Galaxy S8/S8 Plus when you are on the move?

Obviously, there are almost no direct ways for you to view the ISO image file on Galaxy S8/8S Plus since it is not impossible to install a virtual drive on your mobile phone to mount the ISO image file, what's more, the built-in video player app also lacks the ability to handle the ISO image files.

Convert ISO to Galaxy S8/8S Plus

The good new is that with a powerful ISO Ripper application, you can easily convert ISO to Galaxy S8/8S Plus readable file formats listed below:

Video Playback format

MP4, M4V, 3GP, 3G2, WMV, ASF, AVI, FLV, MKV, WEBM

Audio Playback Format

MP3, M4A, 3GA, AAC, OGG, OGA, WAV, WMA, AMR, AWB, FLAC, MID, MIDI, XMF, MXMF, IMY, RTTTL, RTX, OTA, DSF, DFF

If you are looking for a program that's capable of handling both Blu-ray ISO and DVD ISO image files, you can't miss Pavtube ByteCopy, which is a combo function of Blu-ray Ripper and DVD Ripper with full support for Blu-ray disc, BDMV folder, ISO image file and DVD disc, Video_TS folder, IFO/ISO image file.

Hot Search: Blu-ray to Galaxy S8 | DVD to Galaxy S8 | Video to Galaxy S8

With the program, you can easily rip ISO files to Galaxy S8/8S Plus readable video formats like MP4, M4V, 3GP, 3G2, WMV, ASF, AVI, FLV, MKV, WEBM and audio file formats like MP3, M4A, AAC, OGG, WAV, WMA, FLAC listed above. To get better output video and audio quality, you can flexibly adjust output profile parameters including video codec, resolution, bit rate, frame rate, audio codec, bit rate, sample rate, channels, etc as you like.

Get Pavtube ByteCopy with 20% off discount, coupon codec: 45K2D47GJH

How to Convert ISO Files to Samsung Galaxy S8/S8 Plus Playback?

Step 1: Load ISO files.

Initiate the program on your computer, on the main menu bar, click "File" > "Load IFO/ISO" to import ISO files to the program.

Load ISO image files

Step 2: Define the output format.

Clicking the Format bar, from its drop-down list, choose one of Galaxy S8/S8 Plus playable file formats such as "WMV HD Video(*.wmv)" under "HD Video" main category.

Output Galaxy S8/S8 Plus playable file formats

Step 3: Adjust output profile settings.

Click "Settings" on the main interface to open "Profile Settings" window, here, you can flexibly adjust output profile parameters including video codec, resolution, bit rate, frame rate, audio codec, bit rate, sample rate, channels, etc as you like to get better output video and audio quality for Galaxy S8/S8 Plus.

Adjust output profile parameters

Step 4: Begin the conversion process.

After all setting is completed, hit the "Convert" button at the right bottom of the main interface to begin Blu-ray to Galaxy S8/S8 Plus supported video and audio file formats ripping process.

When the conversion is finished, click "Open Output Folder" icon on the main interface to open the folder with generated files. Then follow the steps below to transfer video from computer to Samsung Galaxy S8/S8 Plus:

1. Windows users should download and install the USB drivers for the Galaxy S8/S8 Plus. Mac users can download and install Android File Transfer.
2. Connect the device to an available USB port using the included USB cable.
3. A prompt will appear on the screen of the phone that says "Connected as media device" or "Connected for charging". Drag the notification area down, tap it, then make a selection based on what you wish to do with the device.
- Transferring media files - Connect the phone to your computer to transfer files. Windows users can look under Computer and find the device listed under Portable Devices.

Tuesday, June 6, 2017

Convert Videos to Samsung Galaxy S8/S8 Plus

Samsung's two new flagship phones, the Samsung Galaxy S8 joined by the larger Samsung Galaxy S8 Plus - are now out in the wild. For media enthusiasts who wish to get a Samsung Galaxy S8 or S8 Plus in hand, you may wish to enrich your smartphone with all your personal media types such as store purchased commercial Blu-ray, DVD movies, online downloaded movies/TV shows or device recorders shot footage. The following article will show you how to convert any video into Galaxy S8/S8 Plus for viewing.

Samsung Galaxy S8/S8 Plus supported video

To get video played on Samsung Galaxy S8/S8 Plus, first you should be clear of what video file types can be viewed on Galaxy S8/S8 Plus. From Samsung's official page, we get the information that we can play the following file types on Galaxy S8/S8 Plus.

Video Playback format
MP4, M4V, 3GP, 3G2, WMV, ASF, AVI, FLV, MKV, WEBM

Audio Playback Format
MP3, M4A, 3GA, AAC, OGG, OGA, WAV, WMA, AMR, AWB, FLAC, MID, MIDI, XMF, MXMF, IMY, RTTTL, RTX, OTA, DSF, DFF

Play unsupported disc media or digital video on Galaxy S8/S8 Plus

From above lists, we can see that the supported file formats by Galaxy S8/S8 Plus are limited to just few video and audio file formats. You can extend the media playback capability of Galaxy S8/S8 Plus by downloading third-party video players for Galaxy S8/S8 Plus such as BSPlayer, MoboPlayer, MX Player, VLC Player for Android, RealPlayer, etc.

Obviously, you will fail to open disc media such as commercial Blu-ray/DVD disc or fail to get a better playback effect when viewing certain file types such as MP4, MOV, MKV, AVI, WMV, MXF, AVCHD, XAVC/XAVC S, H.265, Prores, etc on Galaxy S8/S8 Plus. When in that condition, you can download a more powerful media conversion tool - Pavtube Video Converter Ultimate which can assist you to comprehensively rip encrypted Blu-ray/DVD disc or all the unsupported digital file formats into Galaxy S8/S8 Plus readable video or audio file formats listed above. 
To get better output video and audio quality for Galaxy S8/S8 Plus, you can flexibly adjust output profile parameters such as video codec, resolution, bit rate, frame rate, audio codec, bit rate, sample rate, channels, etc as you like.

Reduce video file size for Galaxy S8/S8 Plus

The digital video will occupy a lot of space on your Galaxy S8/S8 Plus, you can compress video with the program in 3 different ways: trim video to remove unwanted parts (no quality loss), lower video bit rate (lossy video compression) or reduce output file size/resolution(lossy video compression).

For Mac users, you can download Pavtube iMedia Converter for Mac to convert unsupported media types for Galaxy S8/S8 Plus on macOS Sierra, macOS High Sierra.

Free download Windows version

Free download Mac version

Step by Step to Convert Video for Galaxy S8/S8 Plus Playback

Step 1: Input Blu-ray/DVD or digital video.

Start the application on your computer. For loading digital video, click "File" > "Add Video/Audio" or "Add from folder" (batch load multiple files) option. For loading Blu-ray or DVD disc, Insert your Blu-ray or DVD disc into your computer's optical drive , hit "File" >  "Load from disc" option.

Load Blu-ray/DVD or digital video

Step 2: Define output file format.

Tap on the "Format" bar, choose Samsung Galaxy S8/S8 Plus best compatible MP4 as output file format. To achieve a smooth video playback effect, it is idea for you to choose to output "H.264 HD Video(*.mp4)" under "HD Video" as final output file format.

Output Galaxy S8/S8 Plus best compatible MP4

Step 3: Reduce file size in 3 different ways.

Adjust output file size and bit rate

Open "Profile Settings" window, here you can reduce video file size by output file resolution or bit rate with small values.

Adjust output file size and bit rate

Trim video file size

Click "Video Editor" icon on the main interface to open video editing window, switch to "Trim" tab, drag the slider bars to set the start time and end time to select only your wanted parts to be converted.

Trim video file size

Step 4: Start the conversion process.

After all setting is completed, hit the "Convert" button at the right bottom of the main interface to begin the conversion process from Blu-ray/DVD/Video to Galaxy S8/S8 Plus supported file formats and settings conversion and ripping process.

When the conversion is finished, click "Open Output Folder" icon on the main interface to open the folder with generated files. Then follow the steps below to transfer video from computer to Samsung Galaxy S8/S8 Plus:

1. Windows users should download and install the USB drivers for the Galaxy S8/S8 Plus. Mac users can download and install Android File Transfer.
2. Connect the device to an available USB port using the included USB cable.
3. A prompt will appear on the screen of the phone that says "Connected as media device" or "Connected for charging". Drag the notification area down, tap it, then make a selection based on what you wish to do with the device.
- Transferring media files - Connect the phone to your computer to transfer files. Windows users can look under Computer and find the device listed under Portable Devices.